


Live streaming has become an essential means of distributing media content to people worldwide. However, setting up and maintaining a live-streaming platform can be challenging, despite its benefits of capturing people’s attention and providing immediate experiences. This article will introduce the ZEGOCLOUD SDK to quickly build a Flutter streaming app.
What is Flutter?
Flutter is an open-source UI software development kit created by Google. It allows developers to build natively compiled applications for mobile, web, and desktop from a single codebase. Using the Dart programming language, Flutter provides a rich set of pre-designed widgets and tools, enabling the creation of visually attractive and highly efficient user interfaces. Its ability to compile to native code makes Flutter a popular choice for developers looking to ensure high performance across multiple platforms without sacrificing quality or user experience.
How Does Live Streaming Work?
Live streaming works by capturing, encoding, transmitting, and delivering real-time video and audio over the internet. The process begins with a camera and microphone recording live content. This raw data is then compressed and encoded into a digital format (e.g., H.264 for video, AAC for audio) to optimize it for streaming. The encoded stream is transmitted to a streaming server via protocols like RTMP, WebRTC, or HLS, where it is then distributed to viewers. A content delivery network (CDN) helps reduce latency and buffering, ensuring a smooth and seamless viewing experience across different devices. This technology is widely used for gaming, events, webinars, and social media broadcasts, making real-time interaction possible.
How to Ensure High-Quality Live Streaming in Flutter
Ensuring high-quality live streaming in a Flutter application involves several strategic decisions and implementations ranging from choosing the right tools and services to handling technical details within the app.
1. Choose a Reliable Streaming Service
The foundation of successful live streaming starts with selecting a robust streaming service. Look for platforms that offer dedicated support for Flutter, such as Agora, ZEGOCLOUD, or Wowza. These services provide comprehensive SDKs that facilitate high-quality streaming, are easy to integrate, and offer extensive documentation and support.
2. Integration of the Streaming SDK
After choosing your streaming service, integrate its SDK into your Flutter app. This process typically involves adding the SDK to your project dependencies, initializing it within your app, and configuring event handlers and settings. This integration is crucial for harnessing the full capabilities of the streaming platform, enabling features like adaptive bitrate streaming and real-time interaction.
3. Set Up User Authentication
Implement robust user authentication to ensure that access to live streaming is secure. This usually involves integrating with your backend to generate and validate tokens or session IDs, which are essential for initializing and maintaining secure live streams.
4. Configure Audio and Video Settings
To achieve the best balance between quality and performance, configure the video resolution, frame rate, and audio quality settings appropriately. High-resolution video and high-quality audio settings enhance the viewer’s experience but require good network conditions to perform optimally.
5. Handle Network Variability
Network conditions can greatly affect streaming quality. Implement adaptive bitrate streaming to dynamically adjust video quality based on the viewer’s bandwidth, ensuring smooth playback under varying network conditions. Also, include auto-reconnection features to automatically resume streaming after temporary network disruptions.
6. Optimize the User Interface
The user interface should be intuitive and responsive, providing a seamless experience across all devices. Include interactive features like chat, and provide essential controls such as volume adjustment and video quality selection to enhance user engagement.
7. Test Across Multiple Devices and Conditions
Conduct thorough testing on different devices and under various network scenarios to ensure the streaming is consistently reliable and performs well across all platforms and conditions. This helps identify potential issues that could impact user experience.
8. Monitor and Analyze Stream Performance
Use analytics tools to monitor the performance of your live streams. This data is invaluable for identifying issues such as latency or buffering that could detract from the user experience, allowing you to make informed improvements.
9. Regular Updates and Maintenance
Regularly update your application and its dependencies to incorporate the latest features and improvements from your streaming SDK. Keeping your app up-to-date ensures optimal performance and access to the newest functionalities offered by your streaming service provider.
Essential Features of Your Flutter Live Streaming App
Building a Flutter live streaming app requires essential features that enhance user engagement and ensure smooth, high-quality streaming. Here are the must-have features for a competitive experience.
- High-quality video and Audio Streaming: Deliver stable, high-resolution video and clear audio with low latency to ensure a seamless, real-time experience.
- Real-Time Chat and Reactions: Enable live chat and reactions to allow viewers to interact with streamers and each other, enhancing engagement and community.
- User Authentication and Profiles: Implement secure user authentication and profiles for personalized experiences and content access control.
- Push Notifications: Send notifications for live events, new streams, or activity updates to keep users engaged and coming back.
- Adaptive Bitrate Streaming: Adjust video quality automatically based on network conditions to ensure smooth streaming without buffering.
- Monetization Options: Include options like donations, subscriptions, or in-app purchases to allow streamers to monetize content, adding value for creators and users.
How to Build a Livestreaming App with Flutter with ZEGOCLOUD
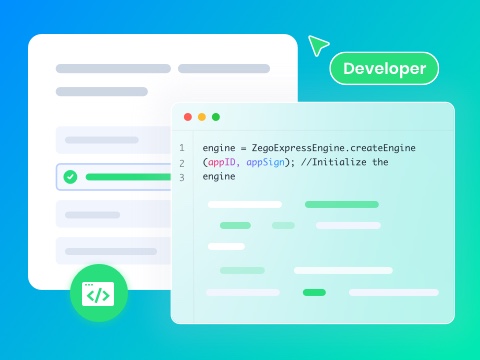
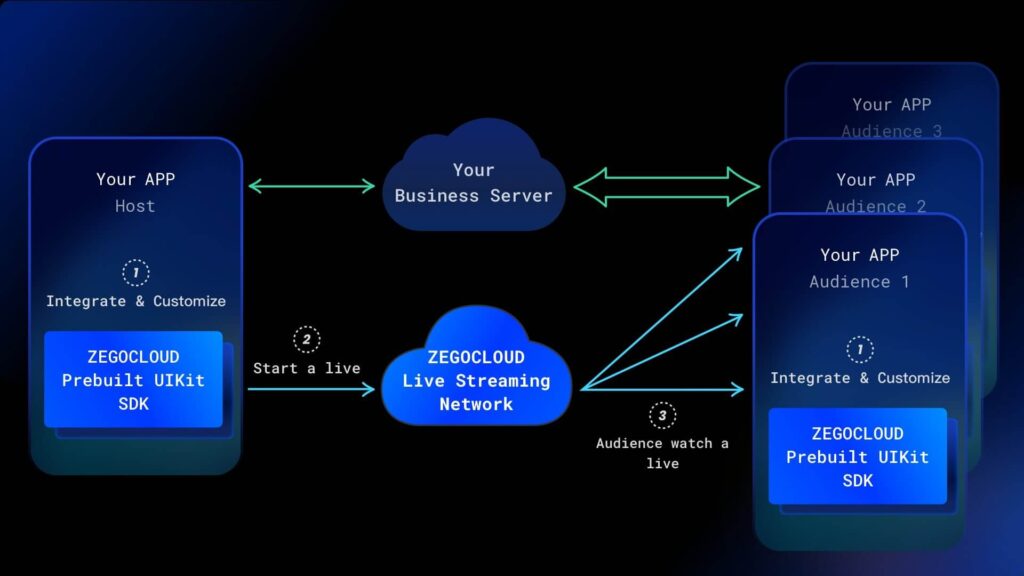
ZEGOCLOUD Flutter Live Streaming SDK provides a range of functions, such as audio and video capture, encoding, streaming, playback, transcoding, and cloud recording. Developers can easily integrate live streaming capabilities into their Flutter apps.
It supports different video qualities, including high definition, standard definition, and smooth, and provides rich audio and video processing capabilities such as filters, beautification, and green screens. You can implement real-time messaging and co-streaming features, making it easy to build interactive live-streaming applications. It is well-documented, with sample code available to help developers get started with Flutter live-streaming app development quickly.
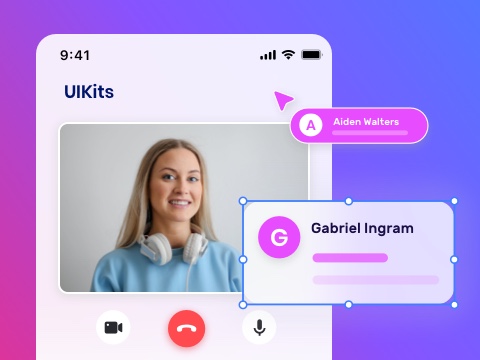
Additionally, as the best Agora live streaming SDK Flutter alternative, ZEGOCLOUD provides every developer with brand-new prebuilt UIKits and 50+ UI Components. It supports cross-platform, including iOS, Android, Web, Flutter, and React Native. Through it, You can complete the development of a live-streaming app within 10 minutes.
Why Choose ZEGOCLOUD for Your Flutter Live Streaming App?
ZEGOCLOUD’s Flutter Live Streaming SDK makes it easy to build a high-quality live streaming app by handling the essential features for you.
What It Includes:
- Pre-built UI & Interaction – Ready-to-use live streaming module.
- Message Sending & Display – Supports real-time chat.
- Audio & Video Transmission – Ensures smooth, low-latency streaming.
- Camera & Microphone Management – Handles permissions and switching.
- Live Viewer Statistics – Tracks audience engagement.
What You Need to Focus On:
- User Registration & Login – Manage accounts.
- Live Stream List Management – Organize ongoing and upcoming streams.
- Monetization Features – Add gifts, top-ups, and other revenue options.
Steps-by-steps to Build a Livestreaming App with Flutter
Preparation
- A ZEGOCLOUD developer account–Sign up
- Flutter 1.12 or later.
- Basic understanding of Flutter development
Steps to Implement live streaming
Create Project
Run the following code to create a new project.
flutter create --template app.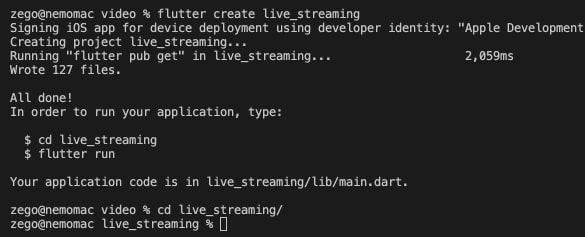
Add live button
Insert two buttons, one to start life and one to watch live.
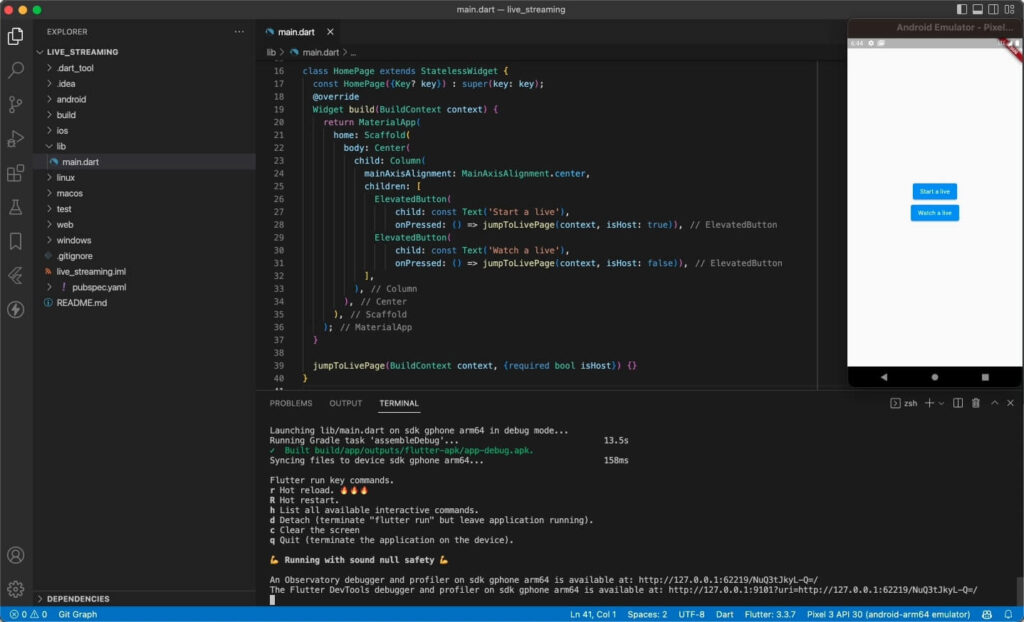
import 'package:flutter/material.dart';

void main() {
  runApp(const MyApp());
}

class MyApp extends StatelessWidget {
  const MyApp({Key? key}) : super(key: key);

  @override
  Widget build(BuildContext context) {
    return const MaterialApp(title: 'Flutter Demo', home: HomePage());
  }
}

class HomePage extends StatelessWidget {
  const HomePage({Key? key}) : super(key: key);
  @override
  Widget build(BuildContext context) {
    return MaterialApp(
      home: Scaffold(
        body: Center(
          child: Column(
            mainAxisAlignment: MainAxisAlignment.center,
            children: [
              ElevatedButton(
                  child: const Text('Start a live'),
                  onPressed: () => jumpToLivePage(context, isHost: true)),
              ElevatedButton(
                  child: const Text('Watch a live'),
                  onPressed: () => jumpToLivePage(context, isHost: false)),
            ],
          ),
        ),
      ),
    );
  }

  jumpToLivePage(BuildContext context, {required bool isHost}) {}
}
Set ZegoUIKitPrebuiltLiveStreaming as a dependency
Run the following command in your project root directory:
flutter pub add zego_uikit_prebuilt_live_streaming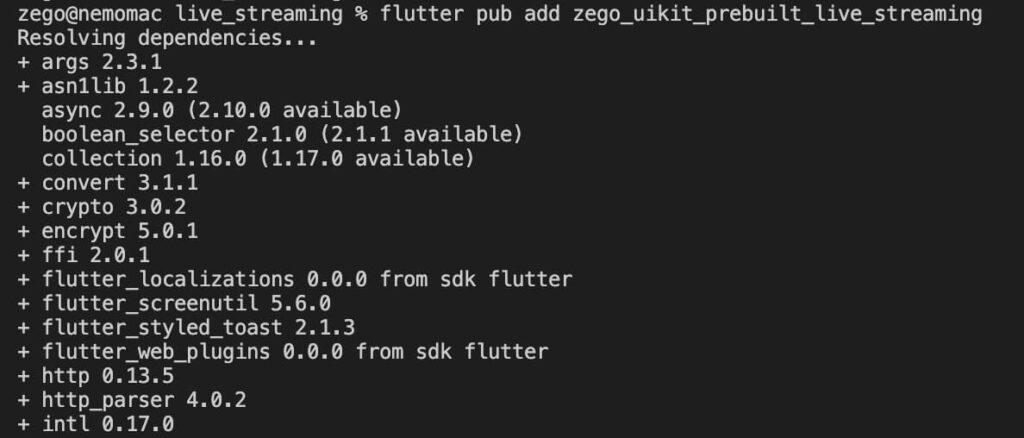
Import the SDK
Now in your Dart code, import the prebuilt LiveStreaming Kit SDK.
import 'package:zego_uikit_prebuilt_live_streaming/zego_uikit_prebuilt_live_streaming.dart';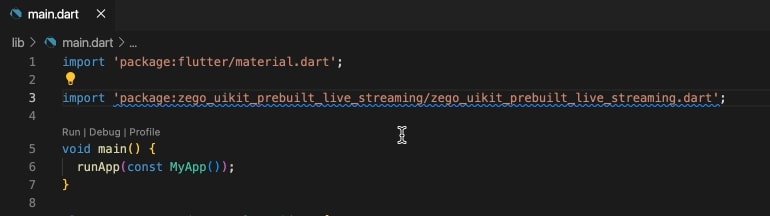
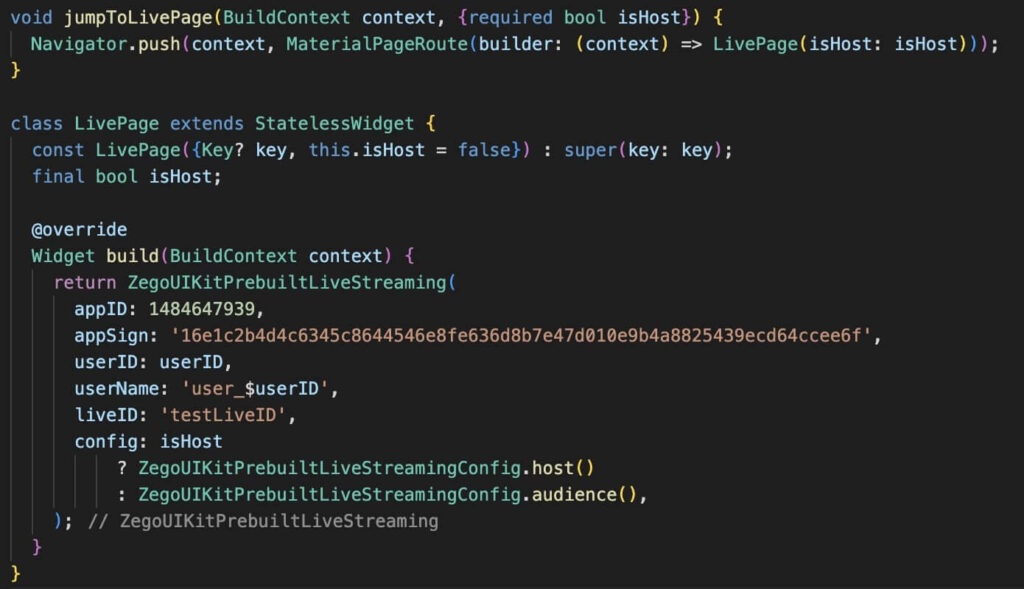
Implement live streaming
Use ZegoUIKitPrebuiltLiveStreaming to quickly build a live-streaming page
class LivePage extends StatelessWidget {
  const LivePage({Key? key, this.isHost = false}) : super(key: key);
  final bool isHost;

  @override
  Widget build(BuildContext context) {
    return SafeArea(
      child: ZegoUIKitPrebuiltLiveStreaming(
        appID: , // use your appID
        appSign: 'yourAppSign', // use your appSign
        userID: userID,
        userName: 'user_$userID',
        liveID: 'testLiveID',
        config: isHost
            ? ZegoUIKitPrebuiltLiveStreamingConfig.host()
            : ZegoUIKitPrebuiltLiveStreamingConfig.audience(),
      ),
    );
  }
}
Now, you can create a new live or watch a live one by navigating to this live page.
void jumpToLivePage(BuildContext context, {required bool isHost}) {
  Navigator.push(context, MaterialPageRoute(builder: (context) => LivePage(isHost: isHost)));
}
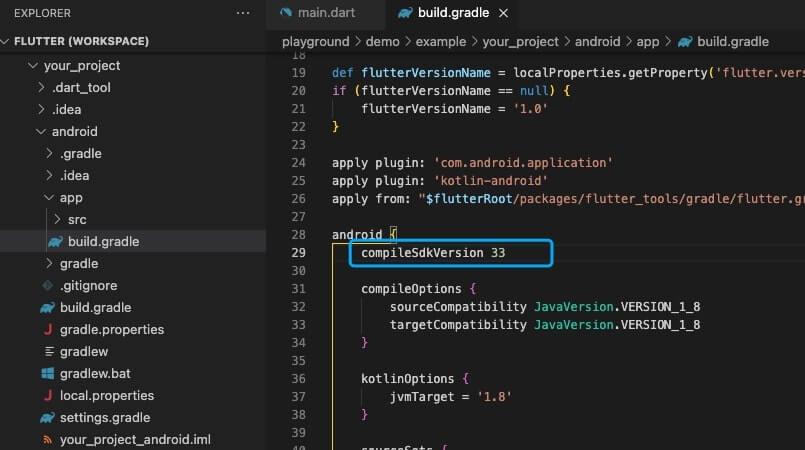
Configure your project
- Android:
- You need to open the
your_project/android/app/build.gradlefile and modify thecompileSdkVersionto 33.
- Add app permissions.
Open the fileyour_project/app/src/main/AndroidManifest.xml, and add the following code:
   <uses-permission android:name="android.permission.ACCESS_WIFI_STATE" />
   <uses-permission android:name="android.permission.RECORD_AUDIO" />
   <uses-permission android:name="android.permission.INTERNET" />
   <uses-permission android:name="android.permission.ACCESS_NETWORK_STATE" />
   <uses-permission android:name="android.permission.CAMERA" />
   <uses-permission android:name="android.permission.BLUETOOTH" />
   <uses-permission android:name="android.permission.MODIFY_AUDIO_SETTINGS" />
   <uses-permission android:name="android.permission.WRITE_EXTERNAL_STORAGE" />
   <uses-permission android:name="android.permission.READ_PHONE_STATE" />
   <uses-permission android:name="android.permission.WAKE_LOCK" />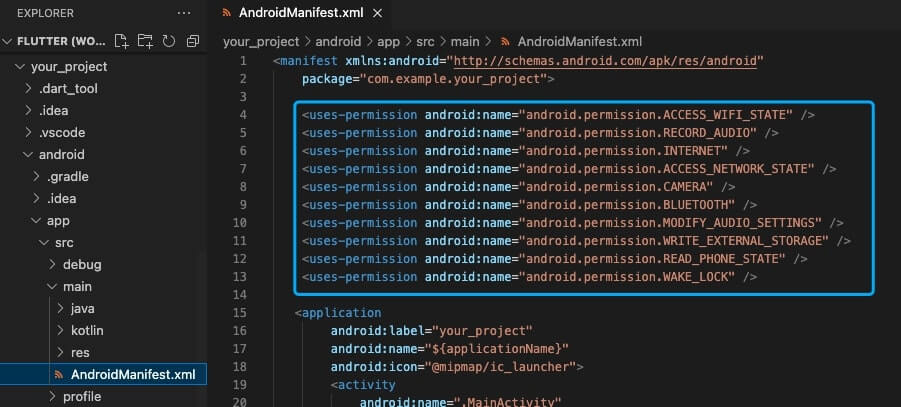
- Prevent code obfuscation.
To prevent obfuscation of the SDK public class names, do the following:
a. In your project’s your_project > android > app folder, create a proguard-rules.pro file with the following content as shown below:
-keep class **.zego.** { *; }b. Add the following config code to the release part of the your_project/android/app/build.gradle file.
proguardFiles getDefaultProguardFile('proguard-android.txt'), 'proguard-rules.pro'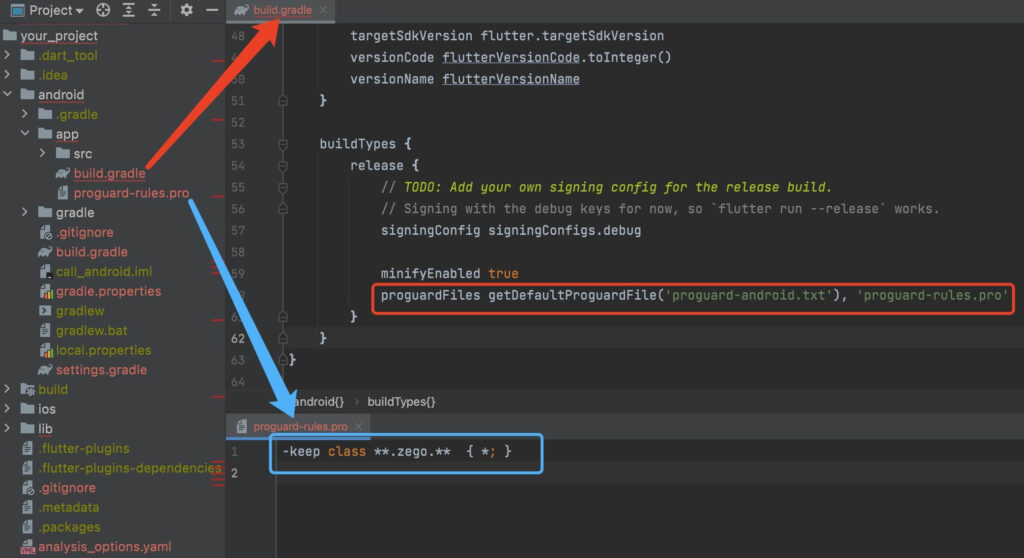
- iOS:
- Add app permissions.
a. open the your_project/ios/Podfile file, and add the following to the post_install do |installer| part:
# Start of the permission_handler configuration
target.build_configurations.each do |config|
  config.build_settings['GCC_PREPROCESSOR_DEFINITIONS'] ||= [
    '$(inherited)',
    'PERMISSION_CAMERA=1',
    'PERMISSION_MICROPHONE=1',
  ]
end
# End of the permission_handler configuration
b. open the your_project/ios/Runner/Info.plist file, and add the following to the dict part:
    <key>NSCameraUsageDescription</key>
    <string>We require camera access to connect to a live</string>
    <key>NSMicrophoneUsageDescription</key>
    <string>We require microphone access to connect to a live</string>
Run a Demo
Conclusion
By integrating these key features, your Flutter live streaming app can deliver a seamless and engaging experience that keeps users returning. Prioritizing quality, real-time interaction, and user engagement will set your app apart, offering a standout platform that meets the needs of modern streaming audiences. With the right approach, your app can create lasting connections and thrive in today’s competitive streaming landscape.
Read more:
FAQ
Q1: How do I integrate a live streaming feature in my Flutter app?
You can integrate live streaming in Flutter using an RTC SDK like ZEGOCLOUD, Agora, or AWS IVS. First, install the SDK, configure the streaming settings, and set up the video player and broadcaster components. Using WebRTC helps reduce latency for real-time interactions.
Q2: Why is my Flutter live streaming video lagging?
Live streaming lag is usually caused by network instability, high bitrate settings, or device performance issues. To fix this:
- Use a CDN to improve content delivery speeds.
- Use adaptive bitrate streaming to adjust video quality dynamically.
- Optimize network settings by prioritizing UDP over TCP.
- Enable hardware acceleration for efficient video encoding and decoding.
Q3: How do I implement multi-host live streaming in Flutter?
To enable multi-host live streaming, use an SDK that supports co-hosting or guest live rooms. ZEGOCLOUD and Agora offer built-in support for multi-host streaming, allowing seamless video/audio interaction between multiple users. Implement session management to handle host permissions, invite guests, and synchronize the stream.
Let’s Build APP Together
Start building with real-time video, voice & chat SDK for apps today!
