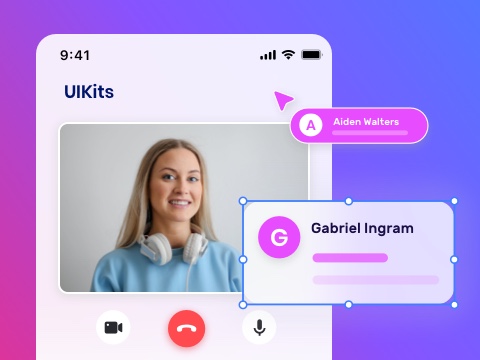


Building a chat app for iOS is one of the most effective ways to add real-time communication to your product—whether it’s for social networking, team collaboration, or customer engagement. With the right development approach and tools, you can easily enable features like one-on-one messaging, group chats, typing indicators, and media sharing. This article will guide you through the key steps to create an iOS chat app, including how to simplify the process using reliable messaging SDKs like ZEGOCLOUD for faster development and better user experience.
Key Components for a Successful iOS Chat App
In today’s digital landscape, chat apps are indispensable for connecting people across personal and professional spheres. To craft a standout chat app, developers must prioritize a smooth, intuitive user journey. Below are essential features that define a high-quality chat app:
- Instant Messaging: At the heart of every chat app lies real-time messaging, enabling immediate delivery and receipt of messages. This feature guarantees fluid conversations, ensuring the app fulfills its core purpose.
- Secure Access: Robust user authentication safeguards sensitive data, allowing only verified users to join. Options like email, SMS, or social logins balance security with convenience.
- Alerts & Updates: Push notifications keep users active by signaling new messages, calls, or updates. This prompts timely responses and boosts engagement.
- Rich Media Sharing: Beyond text, users expect to share images, videos, audio, and files. This versatility enriches conversations, making interactions more dynamic.
- Privacy Protection: End-to-end encryption ensures messages remain private, accessible only to senders and recipients. Trust is built through uncompromising security.
- Group conversations: Group conversations empower users to connect with multiple contacts at once, ideal for teams, communities, or social circles.
How to Experience the Demo for Your iOS Chat App
ZEGOCLOUD provides a sample demo to help you fully enjoy the excellent messaging feature based on In-app Chat SDK.
Before you begin
- Download the demo.
- Prepare the environment:
- Xcode 7.0 or later.
- An real iOS device running on iOS 11.0 or later and connected to the Internet.
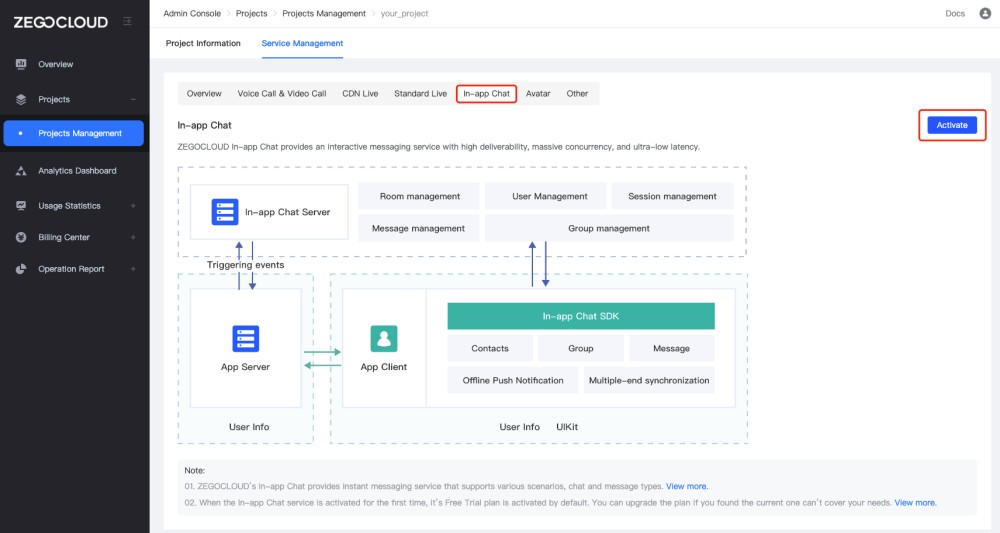
- Go to ZEGOCLOUD Admin Console, and do the following:
- Create a project, get the AppID and AppSign.
- Subscribe to the In-app Chat service.
Run the demo
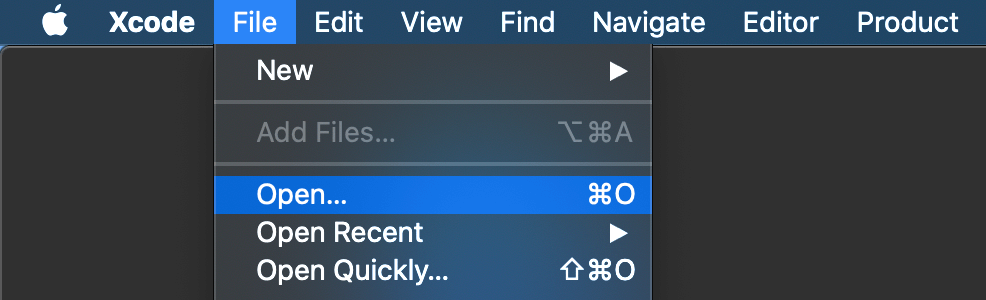
Step 1. In Xcode, go to File > Open, then select the ZIMExampleDemo.xcworkspace file from the extracted demo package.
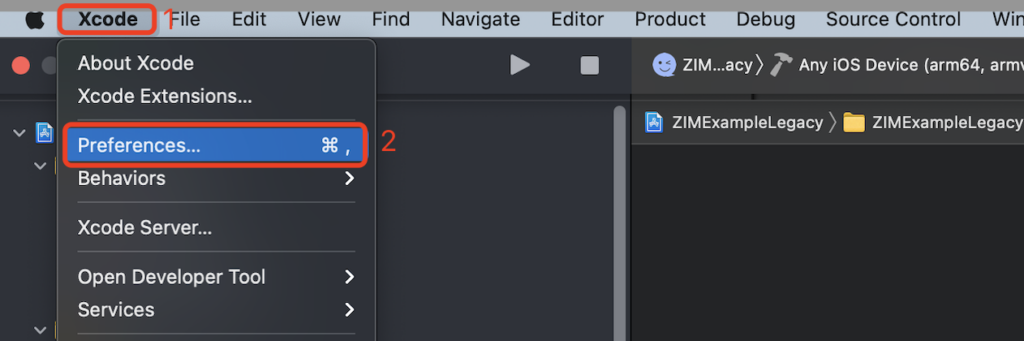
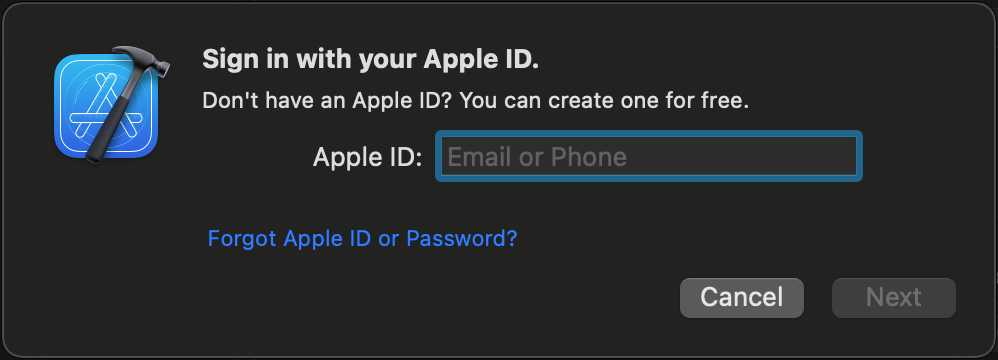
Step 2. In Xcode, go to Preferences, click the Accounts tab, select the + button, choose Apple ID, and then Continue.
Step 3. Select the ZIMExampleDemo project.
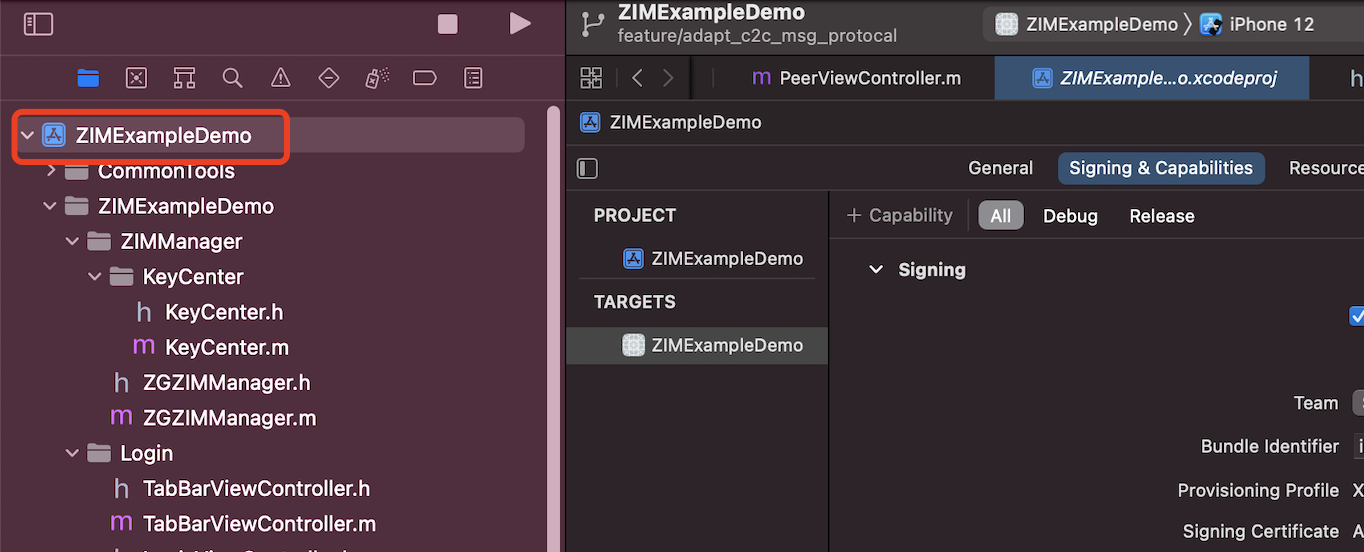
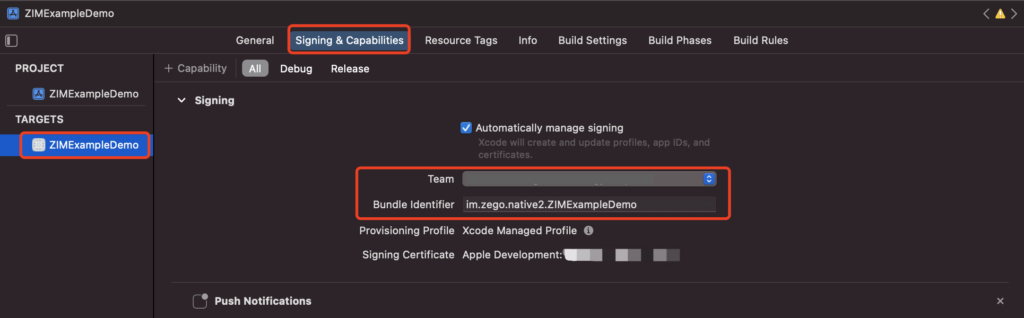
Step 4. Select your target project, go to the Signing & Capabilities tab, modify the Bundle Identifier settings, and choose your personal developer certificate in the Team section.
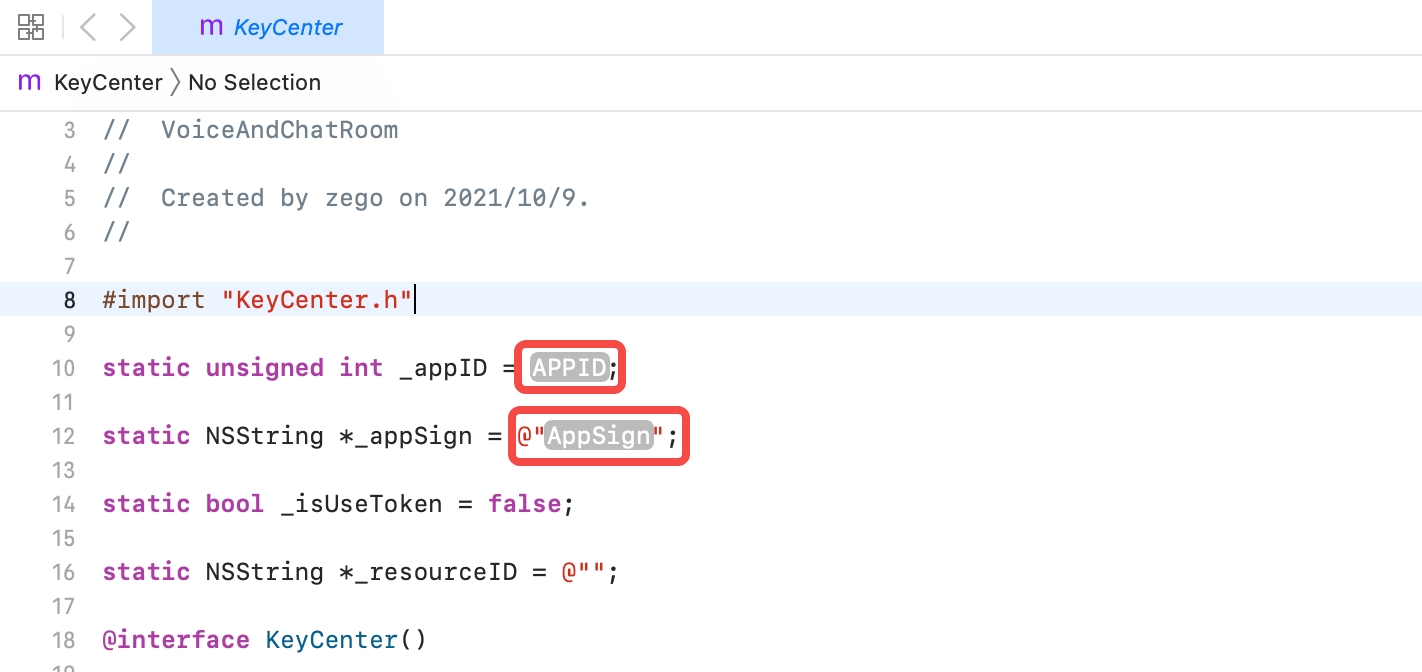
Step 5. Enter the preobtained AppID and AppSign obtained before in the “/ZIMExampleDemo/ZIMExampleDemo/ZIMManager/KeyCenter/KeyCenter.m” file.
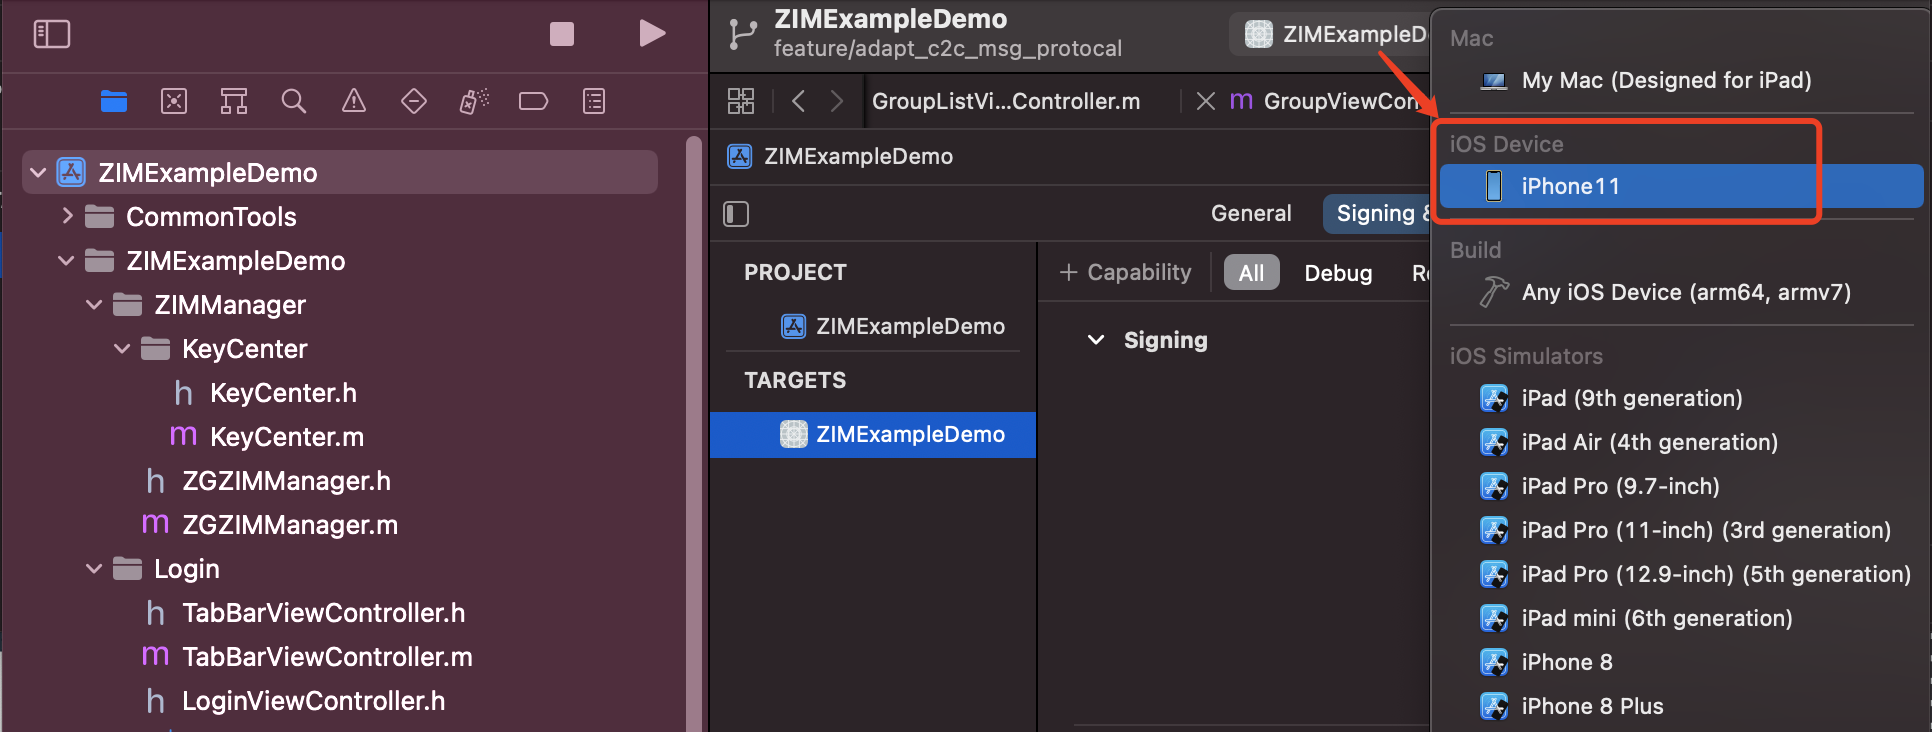
Step 6. Link your iOS device to the computer, then choose the iOS device within Xcode.
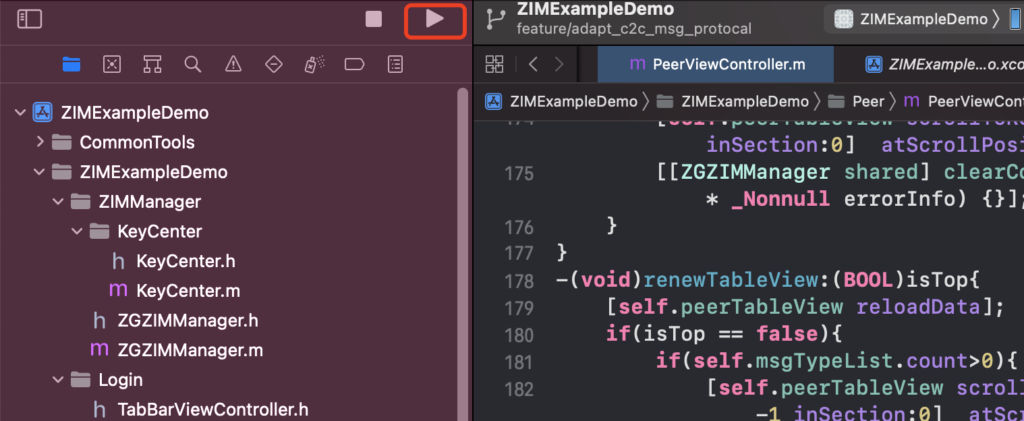
Step 7. Tap the Build icon to execute the sample code and explore the In-app Chat service.
How to Use ZEGOCLOUD SDK to Develop an iOS Chat App
Creating a chat application for iOS presents both exciting opportunities and technical challenges. This project demands proficiency in both front-end development and back-end architecture. In this section, we’ll provide a comprehensive guide to developing an iOS chat app with the ZEGOCLOUD chat SDK. We’ll walk you through from preparing the environment to implementing instant messaging features into your iOS app.
Before you begin
Step 1. Enable In-app chat service
Go to ZEGOCLOUD Admin Console to create a project so as to get the AppID and AppSign. Then, make sure to activate the In-app Chat service.
Step 2. Prepare the environment
- Install Xcode version 13.0 or later.
- Prepare a real iOS device running on iOS 11.0.
Create a project
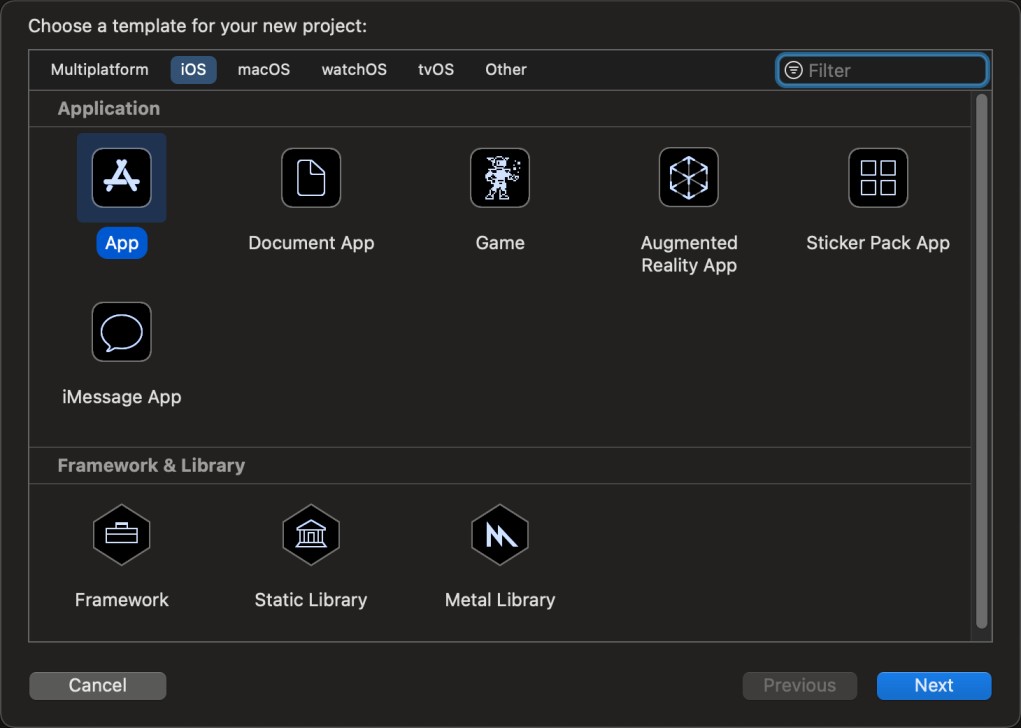
- Launch Xcode, and in the Welcome to Xcode window, click “Create a new Xcode project” directly, or navigate via the top menu bar “File > New > Project”. On the incoming dialog, select the iOS tab, then select App in the Application section.
- Enter project details, including product name (your app’s name, e.g.,
MyApp), organization identifier (in a reverse-domain format, e.g.,com.companyname) and other infomation. Product name and organization Identifier will be used for creating the App UID – Bundle Identifier. Click Next after configuring all fields.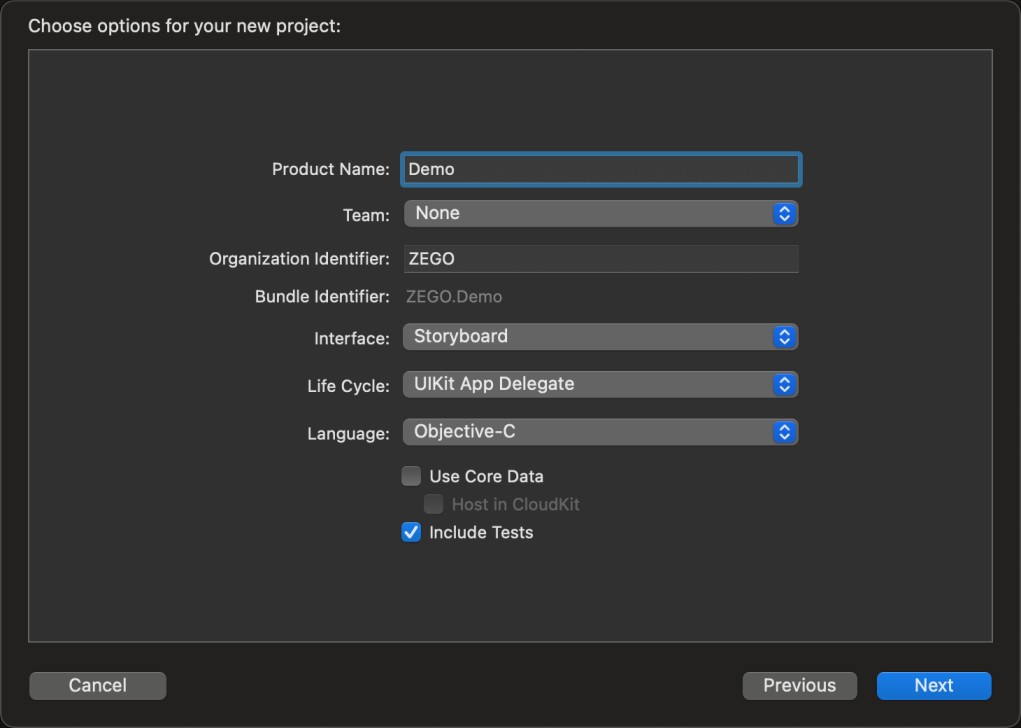
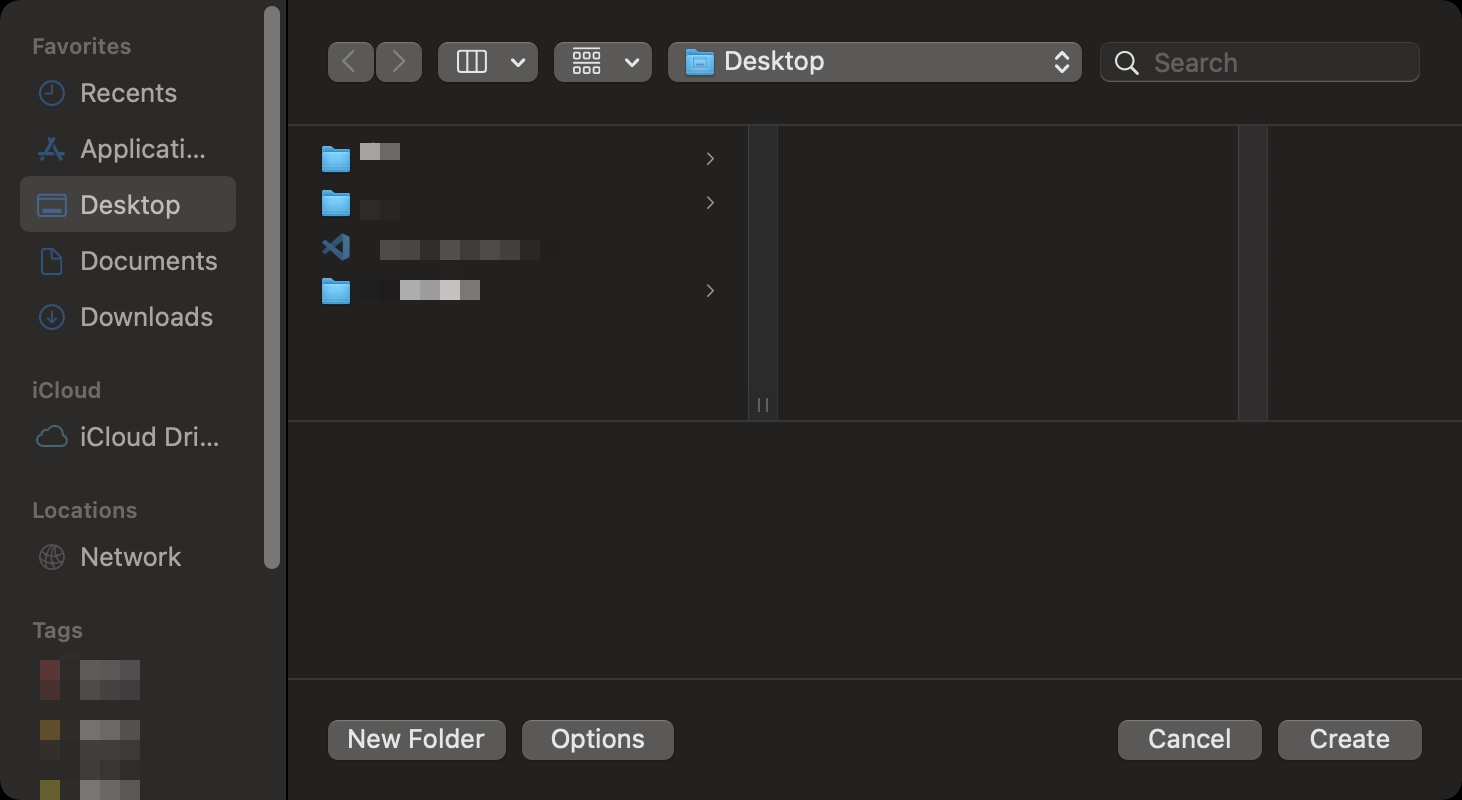
- Choose a save location for your project files.
Import the SDK
Launch Xcode, navigate to the menu bar, and select File > Add Packages…. Under the Apple Swift Packages section, locate the “Search or Enter Package URL” input field, and paste or type the package repository URL:
https://github.com/zegolibrary/zim-iosSpecify the SDK version you want to integrate in “Dependency Rule” (Recommended: use the default rule “Up to Next Major Version”), and then click “Add Package” to import the SDK. You can refer to Apple Documentation for more details.
Import the header file
Import the header file ZIM.h.
#import "ZIM/ZIM.h"Create a ZIM SDK instance
The initial step involves creating a ZIM (In-app Chat) instance, corresponding to a user logging in to the system as a client.
So, imagine we have client A and client B. For them to exchange messages, each needs to invoke the createWithAppConfig method using the AppID and AppSign obtained in advance, thus generating their individual ZIM SDK instances.
// Call the createWithAppConfig method to create a ZIM SDK object and pass your AppID and AppSign.
ZIMAppConfig *appConfig = [[ZIMAppConfig alloc] init];
appConfig.appID = 123456; // Pass in your appID
appConfig.appSign = @""; // Pass in your appSign
ZIM * zim = [ZIM createWithAppConfig:appConfig];
Set up the Event Handler
Before logging in a client user, you must call the setEventHandler method to establish an event handler object that follows the ZIMEventHandler protocol (for instance, self). You’ll need to implement the protocol’s methods to receive callbacks, which you can customize. This setup allows you to get notifications for SDK errors or message – related events.
Below is the sample code to set the event callback for connection status changes in the ViewController file:
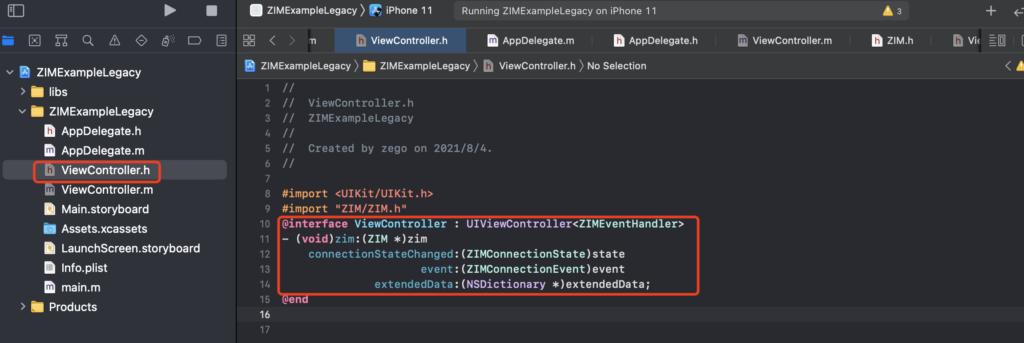
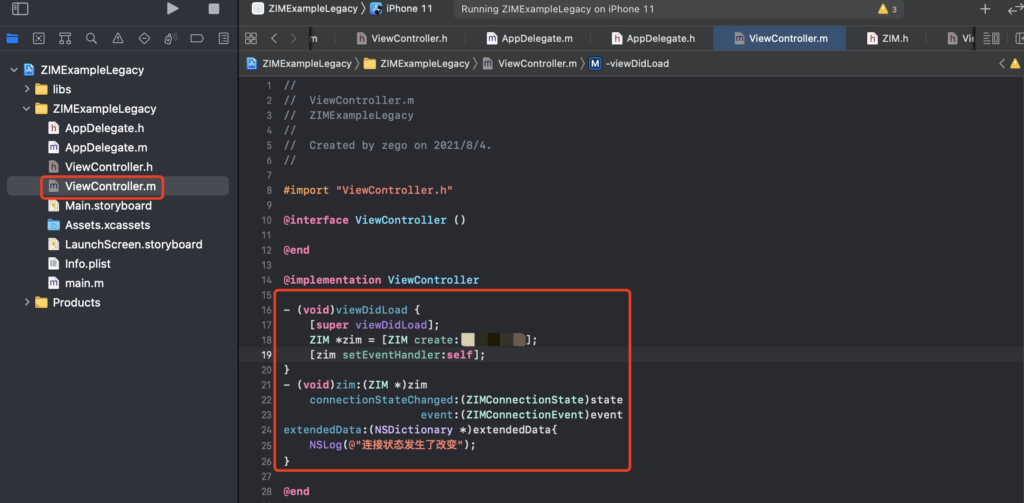
[zim setEventHandler:self];

- (void)zim:(ZIM *)zim errorInfo:(ZIMError *)errorInfo{
    // The callback for receiving error codes. This callback will be triggered when SDK returns error codes.
}

- (void)zim:(ZIM *)zim tokenWillExpire:(unsigned int)second{
    // The callback for Token expires. This callback will be triggered when the Token is about to expire, and you can customize a UI for this event.
}

- (void)zim:(ZIM *)zim connectionStateChanged:(ZIMConnectionState)state event:(ZIMConnectionEvent)event extendedData:(NSDictionary *)extendedData {
    // The callback for connection status changes. This callback will be triggered when the connection status changes, and you can customize a UI for this event.
}

- (void)zim:(ZIM *)zim
    peerMessageReceived:(NSArray<ZIMMessage *> *)messageList
                   info:(ZIMMessageReceivedInfo *)info
             fromUserID:(NSString *)fromUserID {
    // The callback for receiving one-to-one messages.
}
Log in to the ZIM SDK
After creating the ZIM SDK instance, Client A and Client B must log in to send and receive messages.
For login, both clients need to:
- Create a user-specific login configuration (ZIMLoginConfig object)
- Call the loginWithUserID method, passing in this object to complete the ZIM login process
// userID must be within 32 bytes, and can only contain letters, numbers, and the following special characters: '~', '!', '@', '#', '$', '%', '^', '&', '*', '(', ')', '_', '+', '=', '-', '`', ';', '’', ',', '.', '<', '>', '/', '\'.
// userName must be within 256 bytes, no special characters limited.
ZIMLoginConfig *config = [[ZIMLoginConfig alloc]init];
config.userName = @"";

// When logging in:
// If you are using the Token-based authentication mode, you will need to fill in the Token which you generated by referring to the [Authentication] doc.
// If you are using the AppSign mode for authentication (the default auth mode for v2.3.0 or later), leave the Token parameter blank.
config.token = @"";

[zim loginWithUserID:userID config:config callback:^(ZIMError * _Nonnull errorInfo) {

}];
Send messages
After logging in, Client A and Client B can send messages in the following types: text, command, image, video, audio, and file.
To send a message from Client A to Client B, Client A calls the sendMessage method, providing Client B’s userID, Message content, and Other relevant information. If the message was delivered successfully, Client A will receive a callback through ZIMMessageSentCallback to know.
Additionally, the onMessageAttached callback will be triggered. This callback occurs before the message is actually sent. It provides a temporary ZIMMessage that you can use for business logic implementation, such as:
- Getting the message ID before sending
- For large content messages (like videos), getting the localMessageID before upload to implement Loading UI effects
// The following shows how to send one-to-one message, the [conversationType] needs to be set to [ZIMConversationTypePeer].
ZIMTextMessage *zimMessage = [[ZIMTextMessage alloc]init];
zimMessage.message = @"Message content";
ZIMMediaMessageSendNotification *notification = [[ZIMMediaMessageSendNotification alloc] init];
notification.onMessageAttached = ^(ZIMMessage * _Nonnull message) {
    // The callback on the message not sent yet. You can get a temporary object here and this object must be the same as that created zimMessage object. You can make your own business logic using this as needed, for example, display a UI ahead of time.
};
ZIMMessageSendConfig *config = [[ZIMMessageSendConfig alloc] init];
config.priority = ZIMMessagePriorityMedium;  // Set priority for the message. 1: Low (by default). 2: Medium. 3: High.

// In 1-on-1 chats, the conversationID is the peer user ID. In group chats, the conversationID is the groupID. In the chat room, the conversationID is the roomID.
[zim sendMessage:zimMessage toConversationID:conversationID conversationType:ZIMConversationTypePeer config:config notification:notification callback:^(ZIMMessage * _Nonnull message, ZIMError * _Nonnull errorInfo) {
    // Implement the event callback on message sent.
    // toUserID refers to the userID of the message receiver.
}];
Receive messages
After logging in, client B will receive messages from client A via the zim:peerMessageReceived:info:fromUserID: callback, which was set up in the setEventHandler method.
- (void)zim:(ZIM *)zim
    peerMessageReceived:(NSArray<ZIMMessage *> *)messageList
                   info:(ZIMMessageReceivedInfo *)info
             fromUserID:(NSString *)fromUserID{
          for(ZIMMessage *message in messageList){
        if (message.type == ZIMMessageTypeText){
            ZIMTextMessage *textMessage = (ZIMTextMessage *)message;
        }
        else if (message.type == ZIMMessageTypeCommand){
            ZIMCommandMessage *commandMessage = (ZIMCommandMessage *)message;
        }
    }
Log out
In order for a client to log out, the logout method should be called.
[zim logout];Destroy the ZIM SDK instance
To terminate the ZIM SDK instance, invoke the destroy method.
[zim destroy];Conclusion
When developing an iOS chat app, the ZEGOCLOUD SDK offers simplified processes and enhanced features. It enables straightforward implementation of real-time interactions, voice/video capabilities, and secure data practices. For iOS projects, it’s a key component in establishing a feature-packed, user-engaging chat experience. Sign up today to make your chat app remarkable and embrace the infinite possibilities for user engagement!
Read more:
Let’s Build APP Together
Start building with real-time video, voice & chat SDK for apps today!
