Building a React Native chat app is a great way to leverage cross-platform development for real-time communication. In this guide, we’ll cover the key steps to create a functional chat app with ZEGOCLOUD, from setting up your environment to implementing real-time messaging, allowing you to deliver a seamless experience on both iOS and Android.
Why use React Native?
React Native is a powerful framework for mobile app development that allows developers to create apps for both iOS and Android using a single codebase. This cross-platform capability significantly reduces development time and costs, making it an attractive choice for businesses and developers alike. React Native’s component-based architecture enables code reusability, ensuring consistency and maintainability across projects. Additionally, its hot reloading feature allows developers to see changes in real-time, which speeds up the development process and makes it easier to iterate and debug.
Another key advantage of React Native is its ability to deliver near-native performance. By bridging JavaScript with native code, React Native apps can access platform-specific features and libraries, providing a smooth and responsive user experience. The framework is also backed by a large and active community, as well as Facebook, which ensures ongoing improvements, regular updates, and a wealth of resources. This support network, combined with the framework’s flexibility and efficiency, makes React Native an ideal choice for building high-quality, scalable mobile applications.
Who is Using React Native?
React Native is widely used by many leading companies across various industries to build their mobile applications. Notable examples include Facebook, which originally developed React Native and uses it for parts of its mobile app, as well as Instagram, which leverages the framework to manage multiple aspects of its app across platforms. Other prominent companies like Airbnb, Tesla, and Shopify have also adopted React Native for their ability to deliver a consistent and high-performing user experience on both iOS and Android with a single codebase. This widespread adoption highlights React Native’s versatility and effectiveness in real-world applications.
Why Chat App is Important for Your Business?
Chat apps have become essential for businesses as they improve customer communication and increase satisfaction. Therefore, the main reasons why integrating a chat app is crucial for your business are:
- Enhanced customer engagement: By integrating a chat app, businesses can thus engage with customers in personalized conversations that help them better understand customer needs and provide tailored solutions.
- Cost-effective solution: A chat app can help businesses reduce costs by streamlining customer support processes. Instead of investing in additional staff, companies can manage customer inquiries with a chat app, saving time and money.
- 24/7 availability: Chat apps enable businesses to be available to customers round-the-clock, providing them with the convenience of reaching out to businesses at any time.
- Increased sales: Chat app integration helps businesses build trust with customers by providing them with quick and reliable customer support. Consequently, more customer satisfaction increases business sales and revenue.
How to Create Your React Native Chat App
To create your React Native chat app, you can use a React Native chat API that provides the necessary functionalities for building a reliable and scalable chat app. With ZEGOCLOUD app-chat API, you can easily customize your chat app to meet your specific business needs and offer real-time support to your customers.

Preparation
- A ZEGOCLOUD developer account – Sign up
- Create a project in ZEGOCLOUD’s admin console for appID and appSign
- Have NodeJS installed and configured
- Android and iOS device/emulator
Create Your React Native Chat App Tutorial
Here are the essential steps to follow when creating a React Native messaging app using ZEGOCLOUD’s React Native API:
Step 1. Create a new project
If a project has already been created, feel free to skip this step. You can create your React Native chat app with the steps below:
a. Create a new React Native project named”Zego-zim-example“effortlessly using the built-in command line utility, which requires no installation and can be directly used with the Node.js npx command.
npx react-native init zego-zim-exampleb. Execute the iOS build and launch the project.
yarn react-native run-iosc. Initiate the Android build and execute the project.
yarn react-native run-androidStep 2. Import the SDK
To integrate the SDK with your project using NPM, install the dependencies by executing the command”npm i zego-zim-react-native“or”yarn add zego-zim-react-native“.
After that, you can import the SDK into your project by adding the code below.
import ZIM from 'zego-zim-react-native';Step 3. Create a ZIM SDK instance
The initial step is to create a ZIM instance, which represents a client logging into the system. Assuming we have two clients, A and B, they both need to use the create method with the AppID from the Prerequisites steps to establish their own ZIM SDK instance and exchange messages.
// On the initial call, the create method generates a ZIM instance, but all subsequent calls will result in null.

ZIM.create({ appID: 0, appSign: '' });

// To prevent hot updates from causing multiple null returns, it's recommended to obtain a single instance using the getInstance method instead of the create method.

var zim = ZIM.getInstance();
Step 4. Set event callbacks
To personalize event callbacks, including receiving notifications for SDK errors and message-related events, use the on method prior to a client’s login.
// Configure and monitor the callback function for receiving error codes.

zim.on('error', function (zim, errorInfo) {
    console.log('error', errorInfo.code, errorInfo.message);
});

// Set up and listen for the callback for connection status changes.
zim.on('connectionStateChanged', function (zim, { state, event, extendedData }) {
    console.log('connectionStateChanged', state, event, extendedData);
});

// Set up and listen for the callback for receiving one-to-one messages.
zim.on('receivePeerMessage', function (zim, { messageList, fromConversationID }) {
    console.log('receivePeerMessage', messageList, fromConversationID);
});
Step 5. Log in to the ZIM SDK
After creating the ZIM SDK instance, clients A and B must log in to exchange messages and renew tokens. They can do so by creating a user object using the ZIMUserInfo method, followed by logging in with their user information and the Token from the previous Prerequisites steps using the login method.
// The userID should not exceed 32 characters and must only consist of alphanumeric characters and a limited set of special characters such as ~, !, @, #, $, %, ^, &, *, (, ), _, +, =, -, `, ;, ', ,, ., <, >, /, and . \

// userName must be 1-64 characters.
var userInfo = { userID: '', userName: '' };

/*

While logging in, pass the Token obtained from the [Guides - Authentication] document if you're using Token-based authentication. For AppSign authentication mode (default mode in SDK 2.3.0), leave the Token field blank.

*/

zim.login(userInfo, '')
    .then(function () {
        // Login successful.
    })
    .catch(function (err) {
        // Login failed.
    });
Step 6. Send messages
To send a one-to-one message from client A to client B, client A must use the sendMessage method with client B’s userID, message content, and conversation type. The ZIMMessageSentResult callback can verify if the message was successfully sent, while the onMessageAttached callback allows for additional processing of messages before sending, such as obtaining the message ID or implementing a loading UI effect for large content like videos.
// To send a one-to-one message, specify the ZIMConversationType as Peer.

var toUserID = 'xxxx1';
var config = {
    priority: 1 // The message priority can be set as follows: 1 for Low (default), 2 for Medium, and 3 for High.

};
var type = 0; // The session type can have the following values: 0 for One-on-one chat, 1 for Chat room, and 2 for Group chat.

var notification = {
    onMessageAttached: function(message) {
        // todo: Loading
    }
};

// Send one-to-one text messages.
var messageTextObj = { type: 1, message: 'Text message content' };
zim.sendMessage(messageTextObj, toUserID, type, config, notification)
    .then(function ({ message }) {
        // Message sent successfully.
    })
    .catch(function (err) {
        // Failed to send the message.
    });
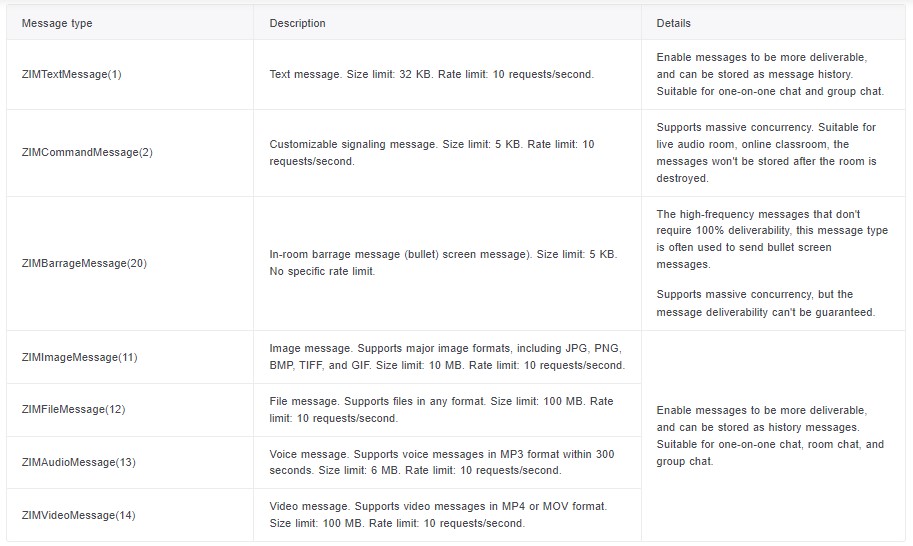
The following message types are currently supported by the ZIM SDK:

Step 7. Receive messages
Once client B is logged in, they will receive messages from client A through the on callback set in the receivePeerMessage method.
// Establish and monitor the callback function for receiving one-to-one messages.

zim.on('receivePeerMessage', function (zim, { messageList, fromConversationID }) {
    console.log('receivePeerMessage', messageList, fromConversationID);
});
Step 8. Log out
When a client is finished using the ZIM SDK, it’s important to log them out properly to ensure the security of their account. The logout method can be called to safely and securely log out a client.
zim.logout();Step 9. Destroy the ZIM SDK instance
If the ZIM SDK instance is no longer needed, it can be destroyed by using the destroy method.
zim.destroy();Run a Demo
To explore the various features of ZEGOCLOUD’s React Native In-app Chat SDK, you can try out the sample demo.
Conclusion
Building a React Native Chat App requires a thorough understanding of the technology, architecture, and tools involved. Following best practices and staying up-to-date with the latest updates is crucial to ensure a seamless user experience. With ZEGOCLOUD’s React Native In-app Chat SDK, you can create a feature-rich and engaging chat app using React Native. Get started now!
Read more:
FAQ
Q1: How long does it take to build a React Native chat app?
The time required to build a React Native chat app depends on the complexity and features of the app. A basic chat app with text messaging can take a few weeks, while a more complex app with features like authentication, media sharing, and video calls may take several months. Using pre-built SDKs like ZEGOCLOUD can significantly reduce development time.
Q2: What are the common challenges when building a React Native chat app?
Common challenges include managing real-time data synchronization, ensuring smooth performance across different devices, handling user authentication securely, and implementing features like push notifications and media sharing. Additionally, integrating advanced features like voice and video calls can be complex without the right tools or SDKs.
Q3: How do I ensure data security in a React Native chat app?
To ensure data security in a React Native chat app, implement end-to-end encryption for all messages, use secure communication protocols like HTTPS, and store sensitive data securely using encryption. Additionally, regularly update your app and libraries to protect against vulnerabilities.
Let’s Build APP Together
Start building with real-time video, voice & chat SDK for apps today!


