In recent years, live streaming has become increasingly popular, and Twitch has emerged as a major player in the industry. However, if you’re looking to create your own live streaming app, building a Twitch clone might be a great option. In this guide, we’ll explore the key steps you need to take to create a successful live streaming app with ZEGOCLOUD live streaming SDK.
How Popular Twitch is in the Market
Twitch’s popularity in the market cannot be denied. The platform has revolutionized the way people consume gaming and entertainment content, with millions of users tuning in daily to watch their favorite streamers. This popularity has made Twitch an attractive platform for advertisers and sponsors, with many brands looking to reach Twitch’s young and engaged audience.
For entrepreneurs and developers, this popularity presents an opportunity to capitalize on the growing demand for live streaming platforms. Building a Twitch clone allows you to tap into the existing market, leveraging the features and functionalities that have made Twitch so successful. By building a Twitch clone, you can create a platform that caters to a specific niche, whether it’s a different type of gaming content, non-gaming entertainment, or something entirely new.
Furthermore, building a Twitch clone can also provide a more cost-effective solution than starting a platform from scratch. You can take advantage of the existing technology and infrastructure used by Twitch, reducing development costs and time to market.
You may also like: How to Create a Dating App like Tinder
Understanding the Key Features of Twitch
Twitch has emerged as a dominant force in the live streaming industry, with millions of users tuning in daily to watch their favorite streamers. To understand what makes Twitch so popular, it’s essential to explore its key features. Here are some of the features that make the Twitch app stand out:
- Live streaming enables users to broadcast their content in real-time, making it easy for viewers to engage with their favorite streamers.
- The chat feature fosters real-time interaction between streamers and viewers, promoting a sense of community and engagement.
- Unique emotes enable users to express themselves creatively and interact with content in a fun and engaging way.
- Donations allow viewers to support their favorite streamers and provide a way for streamers to earn revenue.
- The subscription service offers additional benefits, including ad-free viewing and exclusive content, to enhance the user experience.
- Twitch has emerged as a significant player in the esports industry, broadcasting major tournaments and leagues to a massive audience worldwide.
- The mobile app allows users to stay connected and engage with their favorite streamers on the go.
How to Monetize a Live Streaming Platform
Monetizing a live streaming platform requires a strategic approach that balances revenue generation with user experience. Here’s a concise breakdown of effective monetization strategies:
- Subscriptions and Donations: Offer tiered subscriptions and direct donations to support streamers.
- Ads and Sponsorships: Integrate ads and collaborate with brands for sponsored content.
- Virtual Goods: Introduce interactive gifts and digital merchandise for purchase.
- Pay-Per-View: Charge for access to premium streams or special events.
- Affiliate Marketing: Allow streamers to share affiliate links for earnings.
- Premium Features: Offer ad-free viewing and enhanced customization for subscribers.
- Merchandising: Enable streamers to sell branded merchandise.
- Data Insights: Provide analytics tools for streamers’ audience insights.
- Paid Workshops: Allow streamers to offer paid tutorials or workshops.
Balancing these monetization avenues with a seamless user experience is crucial to retaining your audience’s trust. By diversifying revenue streams and fostering a community-driven atmosphere, you can cultivate a sustainable business model for your live streaming platform, reminiscent of the success seen on platforms like Twitch.
Read more: If you are interested in going deeper on the topic, here is a deep dive for App Monetization.
How to Build Your Own Twitch App Clone with ZEGOCLOUD
How to Create a Live Streaming App like Twitch? Building a Twitch clone app can be a lucrative business venture, as it allows you to capitalize on the existing market and leverage the features and functionalities that have made Twitch so successful. However, building a live streaming platform can be complex and challenging, and it requires specialized knowledge and expertise.
One way to simplify the process is by using the ZEGOCLOUD SDK. It provides a 100% customized live streaming SDK and pre-built UIKits for developers to build high-quality and scalable live streaming applications.
Here are some of the features of the ZEGOCLOUD Live Streaming SDK:
1. Multi-platform support
ZEGOCLOUD Live Streaming SDK supports a wide range of platforms, including iOS, Android, and the web, making it easy to build a cross-platform application.
2. Low-latency streaming
The SDK uses advanced algorithms to minimize latency and ensure smooth and uninterrupted streaming.
3. Cloud recording
ZEGOCLOUD Live Streaming SDK provides cloud recording functionality, allowing you to save and store recorded streams for future use.
4. Customizable UI
The SDK allows developers to customize the user interface of their applications, creating a unique and engaging user experience.
Steps on How to Build Your Own Twitch App Clone
If you’re looking to create your own live streaming platform like Twitch, it’s important to understand the key steps involved in building a successful Twitch app clone. Here’s a brief step to get you started:
Preparation
- ZEGOCLOUD developer account – Sign up
- A computer with internet and web access
- Basic knowledge of web development
- Have NodeJS installed
1. Create a new project
Once you’ve set up your development environment, simply execute the command below to initiate the creation of your project:
react-native init YourProject2. Import the SDK
- Add
"zego-express-engine-reactnative": "^x.y.z"to the dependencies inpackage.json, located in the project’s root directory. - Install the SDK by running either “
npm install zego-express-engine-reactnative --save” or “yarn add zego-express-engine-reactnative” in your project’s root directory. - Install dependencies by running “
pod install” in the iOS root directory.
3. Add permissions
Android
Insert the code below into app/src/main/AndroidManifest.xml:
<!-- Permissions required by the SDK -->
<uses-permission android:name="android.permission.ACCESS_WIFI_STATE" />
<uses-permission android:name="android.permission.RECORD_AUDIO" />
<uses-permission android:name="android.permission.INTERNET" />
<uses-permission android:name="android.permission.ACCESS_NETWORK_STATE" />
<uses-permission android:name="android.permission.CAMERA" />
<uses-permission android:name="android.permission.BLUETOOTH" />
<uses-permission android:name="android.permission.MODIFY_AUDIO_SETTINGS" />
<uses-permission android:name="android.permission.WRITE_EXTERNAL_STORAGE" />
<!-- Permissions required by the App -->
<uses-permission android:name="android.permission.READ_PHONE_STATE" />
<uses-permission android:name="android.permission.WAKE_LOCK" />

<uses-feature
    android:glEsVersion="0x00020000"
    android:required="true" />

<uses-feature android:name="android.hardware.camera" />
<uses-feature android:name="android.hardware.camera.autofocus" />
For certain crucial permissions, Android 6.0 mandates dynamic permissions. Once you have acquired static permissions using AndroidManifest.xml, refer to the code below to request dynamic permissions.
import {PermissionsAndroid} from 'react-native';

const granted = PermissionsAndroid.check(PermissionsAndroid.PERMISSIONS.CAMERA,
                                        PermissionsAndroid.RECORD_AUDIO);
granted.then((data)=>{

        if(!data) {
            const permissions = [PermissionsAndroid.PERMISSIONS.RECORD_AUDIO, PermissionsAndroid.PERMISSIONS.CAMERA];
            PermissionsAndroid.requestMultiple(permissions);
        }
    }).catch((err)=>{
    console.log(err.toString());
    })
}
iOS
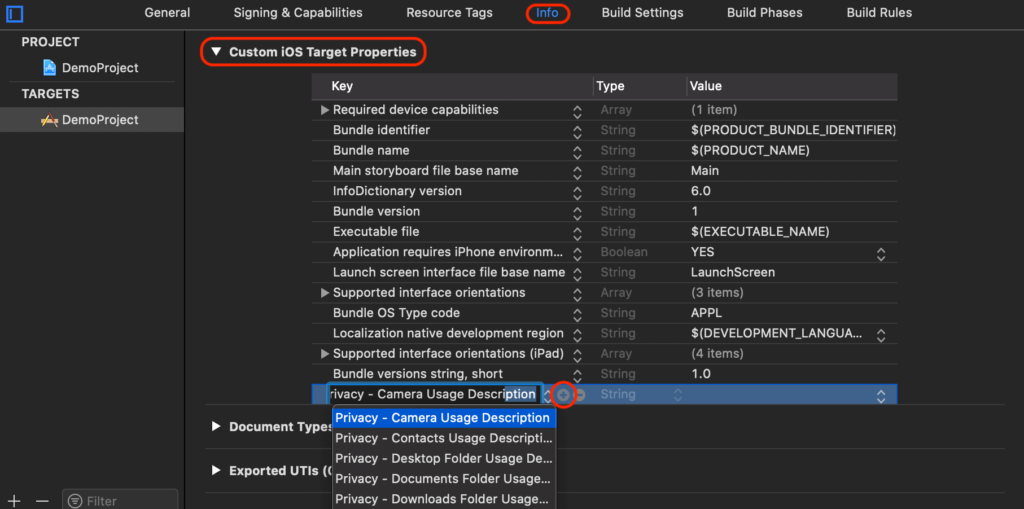
- Choose the target project in Xcode, then navigate to Info > Custom iOS Target Properties.

- Add the following permissions:
Privacy - Camera Usage DescriptionandPrivacy - Microphone Usage Description. The permissions will be shown with a+button after being added.

4. Create a ZegoExpressEngine instance
To obtain an individual class of the ZegoExpressEngine, make use of the createEngine function along with your AppID that corresponds to your project. Call the on method after creating a ZegoExpressEngine instance to receive callbacks. Handle and listen to the callbacks as required. Check out ZegoEventListener for more information about event callbacks.
// Import the ZegoExpressEngine
import ZegoExpressEngine from 'zego-express-engine-reactnative';

const profile = {
appID : xxx,
scenario : 0
};

ZegoExpressEngine.createEngineWithProfile(profile)
5. Log in to a room
To join a room, use the loginRoom method.
// set the token
let roomConfig = {};
roomConfig.token = "xxxx";
// log in to a room
ZegoExpressEngine.instance().loginRoom('room1', {'userID': 'id1', 'userName': 'user1'}, roomConfig);
Implement the appropriate event callback methods of the event handler to handle various events that may occur after joining a room. Below are some common event callbacks that relate to room users and streams:
roomStateUpdate: notifies changes in the current user’s room connection status, such as disconnection or failed login authentication.roomUserUpdate: notifies changes in the status of other users in the room, such as joining or leaving the room.roomStreamUpdate: notifies changes in the status of the streams in the room, such as publishing new streams or stopping existing ones.
ZegoExpressEngine.instance().on('roomStateUpdate', (roomID, state, errorCode, extendedData) => {


  // Callback for current user's room connection status updates.

 // SDK sends connection status updates through the 'roomStateUpdate' callback.


}); ;


ZegoExpressEngine.instance().on('roomUserUpdate', (roomID, updateType, userList) => {

  // When other users join or leave the room, this callback is triggered by the SDK.

});

ZegoExpressEngine.instance().on('roomStreamUpdate', (roomID, updateType, streamList) =>

  // Callback for updates on the status of the streams in the room, including new stream publications and existing stream stops.

});
6. Publish streams
Start publishing a stream
Begin transmitting a local audio or video stream to remote users by utilizing the startPublishingStream method and passing the corresponding Stream ID to the streamID parameter.
ZegoExpressEngine.instance().startPublishingStream("streamID");Implement the necessary event callback methods of the event handler to handle various events that may occur after stream publishing starts, just like the one below:
publisherStateUpdate: notifies changes in the stream publishing status, such as interruption due to network problems or the SDK restarting stream publishing.
ZegoExpressEngine.instance().on("PublisherStateUpdate", (streamID, state, errorCode, extendedData) => {
    // Callback for updates on stream publishing status.

});
7. Play streams
Start playing a stream
Begin playback of a remote audio or video stream by using the startPlayingStream method, providing the corresponding Stream ID to the streamID parameter, and the designated view for rendering the video to the view parameter.
To retrieve the stream IDs of streams published by other users in the room, make use of the roomStreamUpdate callback function.
import { findNodeHandle } from 'react-native';

// Use the Ref attribute from React to enable local video preview on a view.

let remoteViewRef = findNodeHandle(this.refs.zego_play_view);

// Start playing a stream
ZegoExpressEngine.instance().startPlayingStream("streamID", {
    'reactTag': remoteViewRef,
    'viewMode': 0,
    'backgroundColor': 0
});

// React render
render() {
    return (
        <View>
            <ZegoTextureView ref='zego_play_view'/>
        </view>
    )
}
8. Stop publishing and playing streams
Stop publishing a stream
End the publishing of a local audio or video stream to remote users by invoking the stopPublishingStream method.
ZegoExpressEngine.instance().stopPublishingStream();Stop the local video preview
End the local video preview by calling the stopPreview method whenever necessary.
ZegoExpressEngine.instance().stopPreview();Stop playing a stream
Call the stopPlayingStream method with the stream ID of the stream to be stopped passed to the streamID parameter to stop playing a remote audio or video stream.
ZegoExpressEngine.instance().stopPlayingStream("streamID");9. Log out of a room
Call the logoutRoom method with the corresponding room ID passed to the roomID parameter to log out of a room. When you log out successfully, the SDK sends out a notification of the change of room connection status through the callback roomStateUpdate. This will stop all stream publishing, stream playing, and local video preview.
ZegoExpressEngine.instance().logoutRoom('room1');10. Destroy the ZegoExpressEngine instance
Call the destroyEngine method to release resources and destroy the ZegoExpressEngine instance.
ZegoExpressEngine.destroyEngine();Run a Demo
Test real-time audio and video by joining the same room in the ZEGO Express Web Demo using the same AppID, Server, and RoomID. If successful, both local and remote videos and audio will be visible.
Conclusion
Building a Twitch clone requires a combination of technical expertise and a deep understanding of the needs and preferences of your target audience. With the right tools, framework, and development team, you can create a live streaming app that offers a seamless user experience and helps you stay ahead of the competition in the fast-growing world of online video content.
ZEGOCLOUD’s Live Streaming SDK is an excellent tool to consider if you plan to create a live streaming app like Twitch. It provides top-notch media streaming functionality, enhancing the overall user experience of your application.
Read more:
Let’s Build APP Together
Start building with real-time video, voice & chat SDK for apps today!


