

Send and receive messages
This document describes how to use the ZIM SDK (In-app Chat) to send and receive messages.
This document is applicable to the following platforms of Unity framework: iOS, Android, macOS, and Windows.
Prerequisites
Before you begin, make sure:
-
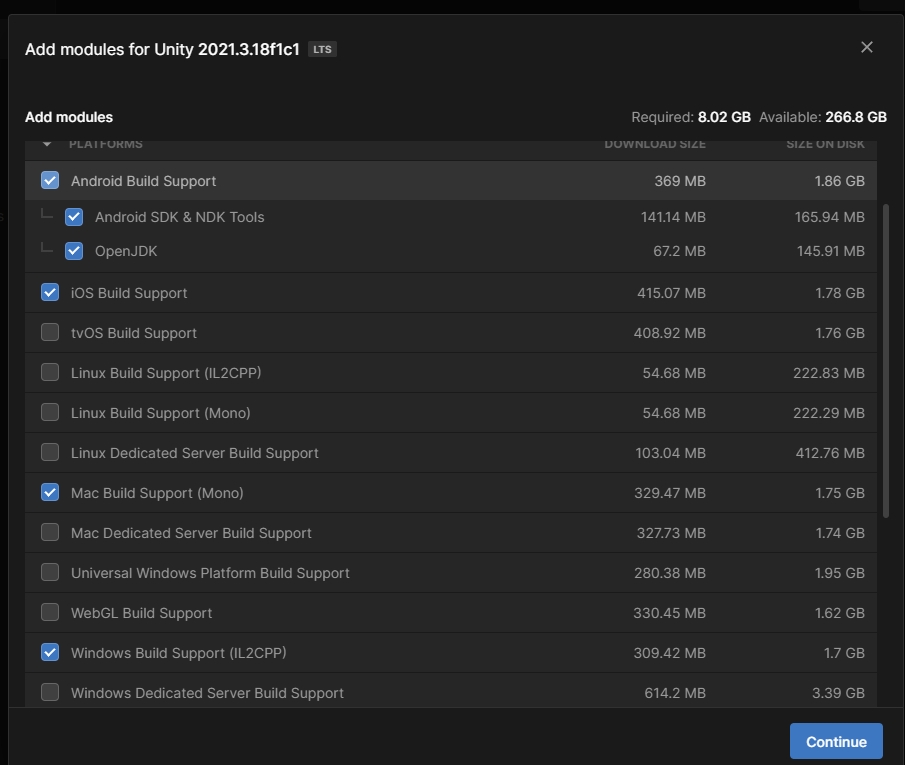
Install Unity 2021.3.18f1c1 or later version. If not installed, you can download Unity Hub from Unity official website, and then install the Unity version you need (if you are not sure, it is recommended to install the latest LTS version). When downloading, it is recommended to select the corresponding Platforms module according to your needs, for example, installing on Windows:
-
Select the corresponding development environment or device according to the platform that the sample code needs to run on:
- To run the Android sample source code: requires devices or emulators that support Android 4.1 or later versions and JDK 1.6 or later versions (it is recommended to use a real device). If it is a real device, please enable the "allow debugging" option.
- To run the iOS sample source code: requires Xcode 13.0 or later versions and devices or emulators that support iOS 9.0 or later versions (it is recommended to use a real device).
- To run the macOS sample source code: requires macOS 10.11 or later versions.
- To run the Windows sample source code: requires Windows 7 or later versions and Visual Studio 2015 or later versions installed.
- Ensure that the device running the program is connected to the network properly.
- Ensure that Unity has installed the Platforms module corresponding to the platform that needs to be run. If Unity has been installed but the corresponding Platforms module has not been installed, you need to download the corresponding module. For example, on Windows: Open Unity Hub, click the "Install" option on the left, select the Unity version to be installed, click the icon in the upper right corner, select the "Add modules" option, and select the corresponding module in the pop-up window for download.
-
Go to ZEGOCLOUD Admin Console to create a project, get the AppID and AppSign.
The SDK also supports token authentication. If you need to upgrade the authentication method, you can refer to Guide for upgrading the authentication mode from using the AppSign to Token.
Integrate the SDK
Optional: Create a project
Skip this step if a project already exists.
Import the SDK
-
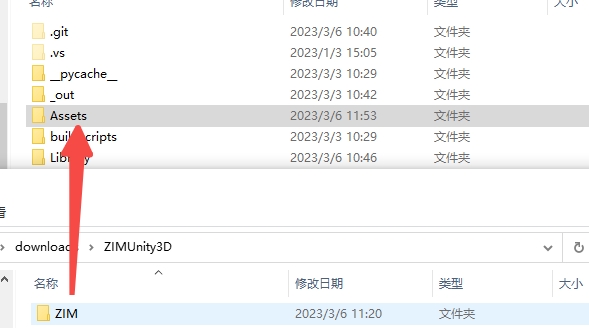
Download and extract the compressed package from SDK. Copy the "ZIM" folder from the extracted ZIMUnity3D directory to the "Assets" directory of your project to integrate the SDK.
-
Additional processing is required for different platforms.
Implementation steps
Import the header file
Include the header file in your project.
using ZEGO;
Create a ZIM SDK instance
Creating a ZIM instance is the very first step, an instance corresponds to a user logging in to the system as a client.
So, let's suppose we have two clients now, client A and client B. To send and receive messages to each other, both of them will need to call the Create method with the AppID and AppSign (When developing web platform applications, there is no need to use "AppSign". To prevent exposure, please do not pass it in.) you get in the previous Prerequisites steps to create a ZIM SDK instance of their own:
// Create a ZIM SDK instance
// Create a ZIM singleton instance through the plugin, passing in APPID and AppSign
// Note: ZIM SDK supports AppSign authentication from version 2.3.0, and the SDK defaults to AppSign authentication. If you need to switch authentication methods:
// (1) For SDK versions 2.3.3 and above, autonomous switching of authentication methods is supported; (2) For SDK version 2.3.0, please contact ZEGOCLOUD technical support to switch to "Token authentication" when needed.

// Define the unique ZIM instance (usually globally defined during actual use)
ZIM zim;

ZIMAppConfig config = new ZIMAppConfig();
config.appID = (uint)appID; // You can get the appID in[ZEGOCLOUD Console](https://console.zegocloud.com). Format: 123456789.
config.appSign = (string)appSign;//  You can get the appSign in[ZEGOCLOUD Console](https://console.zegocloud.com). Format: 0123456789012345678901234567890123456789012345678901234567890123", 64 characters.

zim = ZIM.Create(config);
Since most developers only need to instantiate ZIM once throughout the entire process, We recommends using the GetInstance method to obtain the created instance object.
// After successfully calling the Create method to create an instance, you can obtain the zim object via the GetInstance method.
// Calling the GetInstance method before calling the Create method or after calling the Destroy method to destroy the instance will return null.
ZIM zim = ZIM.GetInstance();
Register callbacks for receiving notifications
Before calling the login interface, you must register the required callbacks.
Refer to the detailed API introduction for more information: OnConnectionStateChanged, OnRoomStateChanged, OnTokenWillExpire, OnReceivePeerMessage, OnReceiveRoomMessage, OnReceiveGroupMessage, OnMessageReceiptChanged, OnMessageRevokeReceived, OnMessageSentStatusChanged, OnConversationChanged, OnConversationTotalUnreadMessageCountUpdated, OnConversationMessageReceiptChanged, OnRoomMemberJoined, OnRoomMemberLeft, OnRoomAttributesUpdated, OnRoomAttributesBatchUpdated, OnRoomMemberAttributesUpdated, OnGroupStateChanged, OnGroupNameUpdated, OnGroupAvatarUrlUpdated, OnGroupNoticeUpdated, OnGroupAttributesUpdated, OnGroupMemberStateChanged, OnGroupMemberInfoUpdated, OnCallInvitationReceived, OnCallInvitationCancelled, OnCallInvitationAccepted, OnCallInvitationRejected, OnCallInvitationTimeout, OnCallInviteesAnsweredTimeout.
Log in to the ZIM SDK
For client A and client B to send and receive messages after creating the ZIM SDK instance, they will need to log in to the ZIM SDK.
To log in, Clients A and B both need to do the following:
The client needs to log in using their respective user information. Call the Login method and pass in the user information ZIMUserInfo object to log in.
-
You can custom the userID and userName, and we recommend you set the userID to a meaningful value and associate them with the account system of your application.
-
For SDK 2.3.0 or later: The SDK uses the AppSign authentication mode by default. You only need to pass the ZIMUserInfo when logging in.
-
If you use the Token-based authentication mode, please refer to the Authentication to get the Token first, and pass it when logging in.
// userID is a string of up to 32 bytes. Only digits, English characters and the following special characters are supported: '!', '#', '$', '%', '&', '(', ')', '+', '-', ':', ';', '<', '=', '.', '>', '?', ' '[', ']', '^', '_', '{', '}', '|', '~'.
// userName is a string of up to 256 bytes with no special character restrictions.
ZIMUserInfo userInfo = new ZIMUserInfo();
userInfo.userID = "xxxxx";
userInfo.userName = "xxxxx";

// Log in:
// Use Token authentication: fill in the Token generated by referring to the "Use Token for authentication" document. For details, please refer to [Use Token for authentication] doc.
// Use AppSign authentication: (default authentication method for version 2.3.0 or above), leave the Token parameter as an empty string.
ZIM.GetInstance().Login(userInfo, "", (ZIMError errorInfo) =>
{
    if(errorInfo.code == ZIMErrorCode.Success)
    {
        //Login successful
    }
    else
    {
        // Login failed
    }
});
Send messages
Client A can send messages to client B after logging in successfully.
Currently, the ZIM SDK supports the following message types:
| Message Type | Description | Features and Applicable Scenarios |
|---|---|---|
| ZIMCommandMessage(2) | A signaling message with custom data content defined by the developer. The message size does not exceed 5 KB, and the sending frequency per client is limited to 10 times per second. | Non-storable, supports higher concurrency; generally used for signaling transmission within rooms such as "voice chat rooms" and "online classrooms," such as muting/unmuting, sending gifts, and transmitting online class materials. Relevant interfaces: SendMessage |
| ZIMBarrageMessage(20) | Bullet screen text message in a room. The message size does not exceed 5 KB, and there is no limit on the sending frequency per client. | Non-storable, specifically used for high-frequency, unreliable, and drop-allowable messages within rooms. It is generally used for sending "bullet screen messages" in scenarios. Supports high concurrency but is unreliable, and does not guarantee message delivery. Relevant interfaces: SendMessage |
| ZIMTextMessage(1) | Text message. The message size does not exceed 32 KB, and the sending frequency per client is limited to 10 times per second. | Messages are reliable and ordered, and can be stored as historical messages (for storage duration, please refer to the "History Message Storage Duration" in Pricing - Plan Differences). It can be used in instant messaging scenarios such as one-on-one chats, rooms, and group chats. After a room is dissolved, "room chat" messages are not stored.
Relevant interfaces: SendMessage, SendMediaMessage |
| ZIMImageMessage(11) | Image message. Supports mainstream image formats, including JPG, PNG, BMP, TIFF, GIF, WebP. The size does not exceed 10 MB, and the sending frequency per client is limited to 10 times per second. | |
| ZIMFileMessage(12) | File message. The message content is a file with no format restrictions. The size does not exceed 100 MB, and the sending frequency per client is limited to 10 times per second. | |
| ZIMAudioMessage(13) | Audio message. Supports MP3 and M4A audio formats. The duration does not exceed 300 seconds, and the size does not exceed 6 MB. The sending frequency per client is limited to 10 times per second. | |
| ZIMVideoMessage(14) | Video message. Supports MP4 and MOV video formats. The size does not exceed 100 MB, and the sending frequency per client is limited to 10 times per second. Only video files encoded with H264 or H265 video codecs support retrieving the width and height information of the first frame after successful message sending. | |
| ZIMCustomMessage(200) | Custom message. Developers can define the type of custom message and handle message parsing. The ZIM SDK does not define or parse the specific content of custom messages. |
To send one-to-one messages, for example, client A wants to send a message to client B, then client A needs to call the sendMessage method with client B's userID, message content, conversation type (conversationType).
And client A can be notified whether the message is delivered successfully through the callback ZIMMessageSentCallback.
- onMessageAttached callback: The callback on the message not sent yet. Before the message is sent, you can get a temporary ZIMMessage message for you to implement your business logic as needed. For example, before sending a message, obtain the ID information of the message. When you send messages with larger content such as videos, they can cache the message object before the message is uploaded, and keep it until they receive a successful sending notification from the SDK. By comparing the same object, they can achieve the effect of loading before sending.
// // The following shows how to send one-to-one message, the [conversationType] needs to be set to [ZIMConversationType.Peer].

string toConversationID = ""; // peer's userID
ZIMConversationType type = ZIMConversationType.Peer; // Conversation type is ZIMConversationType.Peer
ZIMTextMessage message = new ZIMTextMessage("Message content");
ZIMMessageSendConfig messageSendConfig = new ZIMMessageSendConfig(); // Use the default config.
ZIMMessageSendNotification notification = new ZIMMessageSendNotification(); // Message notification.
ZIM.GetInstance().SendMessage(message, toConversationID, type,
messageSendConfig, notification, (ZIMMessage callbackMessage, ZIMError errorInfo) =>
{
    if(errorInfo.code == ZIMErrorCode.Success)
    {
        // Sent successfully.
    }
    else
    {
        // Failed to send.
    }
});
Receive messages
After client B logs in, he will receive client A's message through the callback OnReceivePeerMessage.
// Register the callback for "receive one-to-one messages" listener.
ZIM.GetInstance().onReceivePeerMessage = (ZIM zim,
                         List<ZIMMessage> messageList,
                         string fromUserID) =>
{
    // messageList is the received one-to-one message.
};
Log out
For a client to log out, call the logout method.
ZIM.GetInstance().Logout();
Destroy the ZIM SDK instance
To destroy the ZIM SDK instance, call the destroy method.
ZIM.GetInstance().Destroy();