

Troubleshooting call invitations
If you encounter offline call issues, we recommend testing and ensuring that the online call function is working properly before troubleshooting the offline problem. This usually shortens the time it takes to troubleshoot your issue.
Below are common combinations of integration issues and phenomena. You can quickly try to self-diagnose and locate the cause of the problem using this list.
Troubleshooting online calls
There are usually three potential issues that can occur with online calls:
1 Callee's UI not responding after caller's call button clicked
If the UI does not respond after the caller clicks the call button, please check the following:
- Make sure that the userID of the user being called is valid.
- Check if there is any error reported on the caller side, please refer to Check if there is any error on the calling side.
- Check if the callee has correctly invoked the init function, please refer to Check if the init logic is handled correctly.
2 There is a ringing sound but no incoming call dialog.
Please Check if the NavigatorKey and useSystemCallingUI are correctly configured.
3 First time working fine, but subsequent openings of the application cannot show invitation dialogs.
The problem usually occurs because the "auto login" related logic in your app does not call ZegoUIKitPrebuiltCallInvitationService().init after the user successfully "auto login", resulting in a failure to log in to our sdk. Please refer to Check if the init logic is handled correctly.
4 No ringtone sound during invitation
If the call only vibrates without sound, please check the following:
- The audio file is located in the
assetsdirectory. - The file path specified in the initialization configuration parameter
ringtoneConfigis accurate and valid. - If the audio file can be played correctly.
- If the duration of the audio file is less than 30 seconds.
If all of the above configurations are correct, the issue should be resolved.
5 The invitation notification dialog box did not pop up in background mode(only Android)
Please check if SystemChannels.lifecycle.setMessageHandler is used. SystemChannels.lifecycle.setMessageHandler can be listened to only once in the entire app. Therefore, if you also want to listen to this event, please use ZegoUIKit().adapterService().registerMessageHandler(youHandler) to handle, Moreover, remember that when the page is disposed, you should use ZegoUIKit().adapterService().unregisterMessageHandler(youHandler).
6 Call invitations limited to specific screens
The issue is likely caused by calling the ZegoUIKitPrebuiltCallInvitationService().init method only on a specific screen, which prevents the call invitation notification from being received on other screens.
To avoid this issue, we recommend calling the ZegoUIKitPrebuiltCallInvitationService().init method right after the user logs in (such as after clicking on "Sign in/Continue with Google/Continue with Apple" and receiving a successful callback), since the Call Kit SDK needs to start listening for incoming calls immediately after the app is initialized. Please also avoid making duplicate calls to this method.
Once you have confirmed that the timing of the call is correct, your app should be able to receive call invitations on all screens. Please note that this issue can also cause offline calls to be unavailable.
Troubleshooting offline calls
Offline call issues can be complex and tricky, particularly on Android devices. To help you, we have listed some common situations and their corresponding solutions below.
- Before attempting to troubleshoot offline calls, please make sure that the online call invitation feature is working properly.
- Please Check if the test device has granted the APP related permissions.
1 I can receive the call invitation, but after clicking accept, it jumps to the app without entering the calling page.
- Please Check if the NavigatorKey and useSystemCallingUI are correctly configured.
- Please Check if the init logic is handled correctly.
2 I can receive call invitations, but only get notifications without accept and decline buttons on the invitation dialog.
Please Check if the ResourceID configuration is correct.
3 I can receive the call invitation, but there is only ringing without an invitation dialog.
- Please Check if the NavigatorKey and useSystemCallingUI are correctly configured.
- Please Check the configuration of AndroidManifest.xml.
4 I can receive the call invitation, but after clicking accept, the application cannot be launched.
- Please Check if the test device has granted the APP related permissions.
- Please Check the configuration of AndroidManifest.xml.
5 After accepting the call, I was able to enter the call page, but immediately redirected to another page.
This is usually because your app triggers timed page navigation after it starts. Please carefully check your page navigation logic.
6 Users can still receive offline notifications after logging out of the app.
After the user logs out of the APP, you should call ZegoUIKitPrebuiltCallInvitationService().uninit().
/// on App's user logout
void onUserLogout() {
  /// 1.2.2. de-initialization ZegoUIKitPrebuiltCallInvitationService
  /// when app's user is logged out
  ZegoUIKitPrebuiltCallInvitationService().uninit();
}
7 Callee does not receive call invitation notification when offline
Please make sure that you are using the latest versions of both zego_uikit_prebuilt_call and zego_uikit_signaling_plugin. Using outdated versions may cause bugs that prevent offline call functionality from working properly.
After installation, some Android devices may block the app from displaying notifications by default. We recommend opening your app settings and checking if notification permissions have been granted to your app, ensuring that your app is allowed to display notifications
When debugging from your IDE (Android Studio/Xcode/VS Code), you can usually view important information such as push id or pushID in your app's console logs. Make sure to check that the callee has obtained the Push ID correctly.

If you are having trouble obtaining a valid Push ID, it may be due to issues with your certificate configuration. We recommend reviewing the Quick start (with call invitation)
documentation again to ensure that your certificate configuration on the console is correct. Once configured correctly, you should see something similar to the following:
If you are still unable to obtain a Push ID after configuring your certificate on ZEGOCLOUD's Admin Console, please double-check the Bundle ID of your certificate on iOS and the package_name in the google-service.json file on Android to ensure that they match the package name of your project.
For iOS projects, the Bundle ID of your certificate must match the Bundle Identifier of your Xcode project. For Android projects, the package_name in the google-service.json file must match the package attribute in the AndroidManifest.xml file of your project.
Once you have confirmed that your certificate is properly configured and the project information matches the certificate, you should be able to obtain the Push ID correctly.
To check if you can receive debug messages from the ZEGOCLOUD console, please log in to ZEGOCLOUD's Admin Console
and navigate to Projects Management > Your Project > Service Management > In-app Chat page. Here, you will find a Push Debug button. Click on this button and fill in the example information provided in the popup window. Once the information is filled in, click the Test button to complete the process.
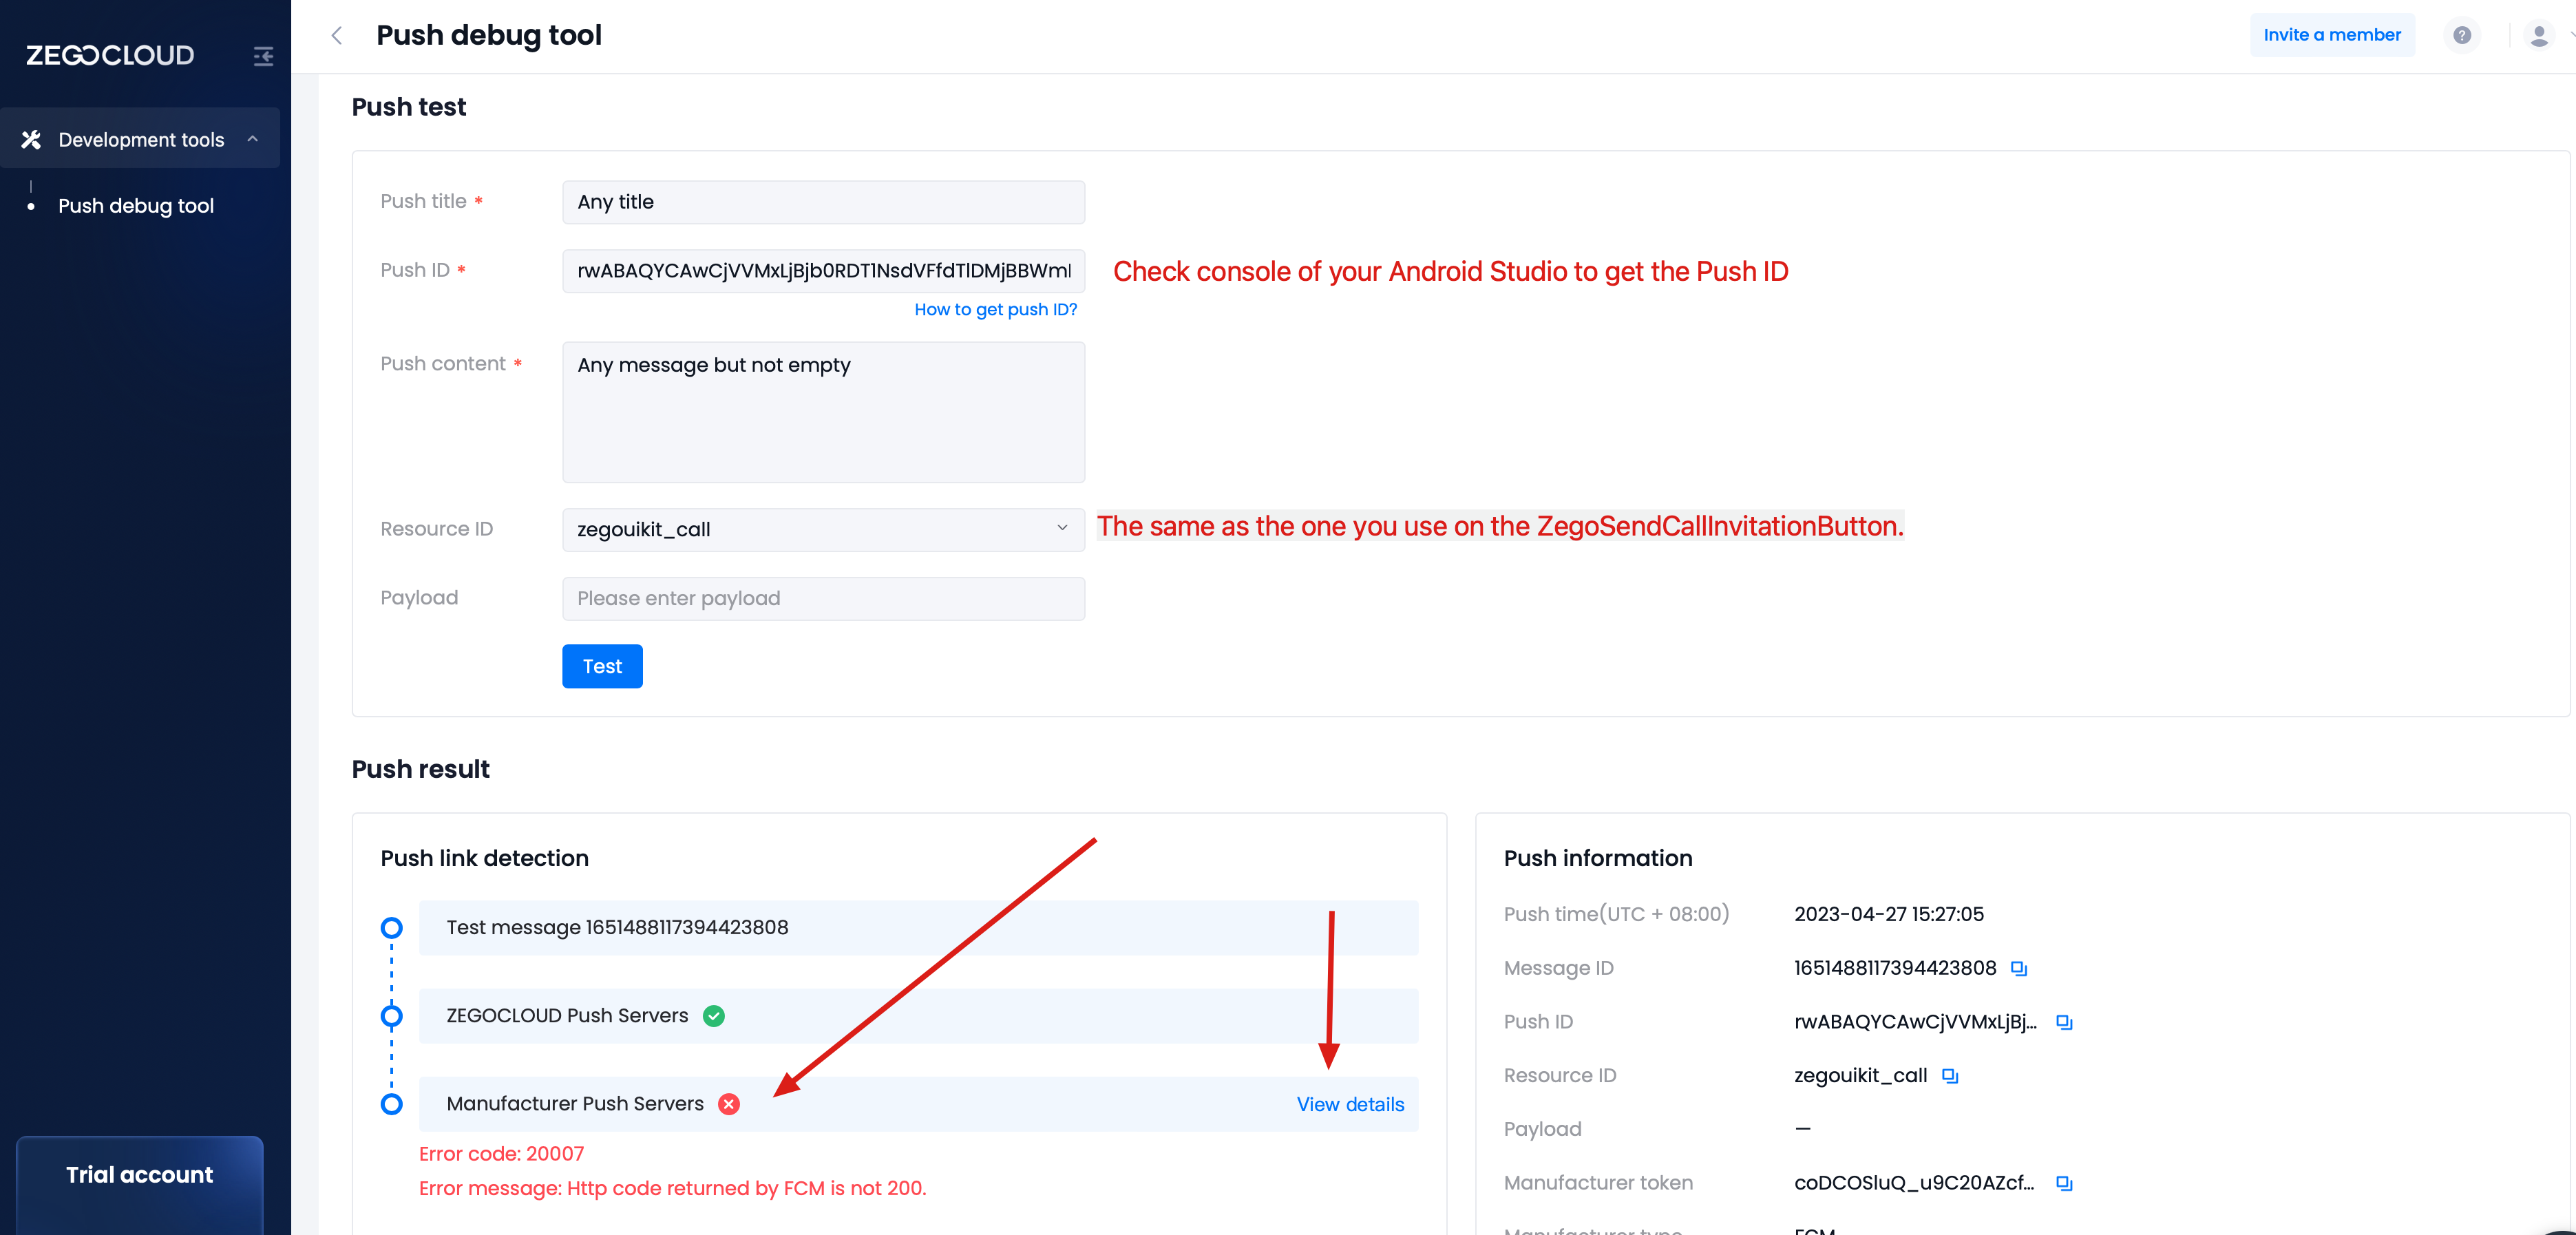
If you encounter errors related to Manufacturer Push Servers when clicking the Test button, click on View details to see more information. This can help you identify the root cause of the issue.
The Manufacturer Push Servers error may be caused by the following:
- The callee is not registered or logged in, which can cause the test to fail. Ensure that the callee's app has not been uninstalled or the callee has not logged out of the app.
- For Android devices, your Firebase project may have been modified or deleted, causing the information to be mismatched. Confirm this by logging in to the Firebase console.
- For iOS devices, your push certificate may have been modified or deleted on the Apple developer website, causing the information to be mismatched. Confirm this by logging in to the Apple developer website.
Check List
Check if the latest package version is being used
It is possible that your issue has already been fixed in the old version. Before further troubleshooting, we strongly recommend that you upgrade zego_uikit_prebuilt_call, zego_uikit_signaling_plugin, and zego_uikit to the latest version for testing. If you encounter any problems during the upgrade, please refer to our migration guide.
Check if there is any error on the calling side.
Please listen and check the onPressed callback of the ZegoSendCallInvitationButton on the caller side. The callback type is void onPressed(String code, String message, List\<String> errorInvitees). Please check the error code and message, and check if the errorInvitees list is empty.
Please refer to this link for error codes' details.
In addition, if you use the
customDataparameter when sending a call invitation, please note that this parameter cannot exceed 1024 bytes.
Check if the test device has granted the APP related permissions.
Pease make sure that the app has been granted relevant permissions in the phone settings. Also please check if the phone is in Do Not Disturb mode.
Here are the permissions that an Offline Push APP needs on Xiaomi devices for reference:
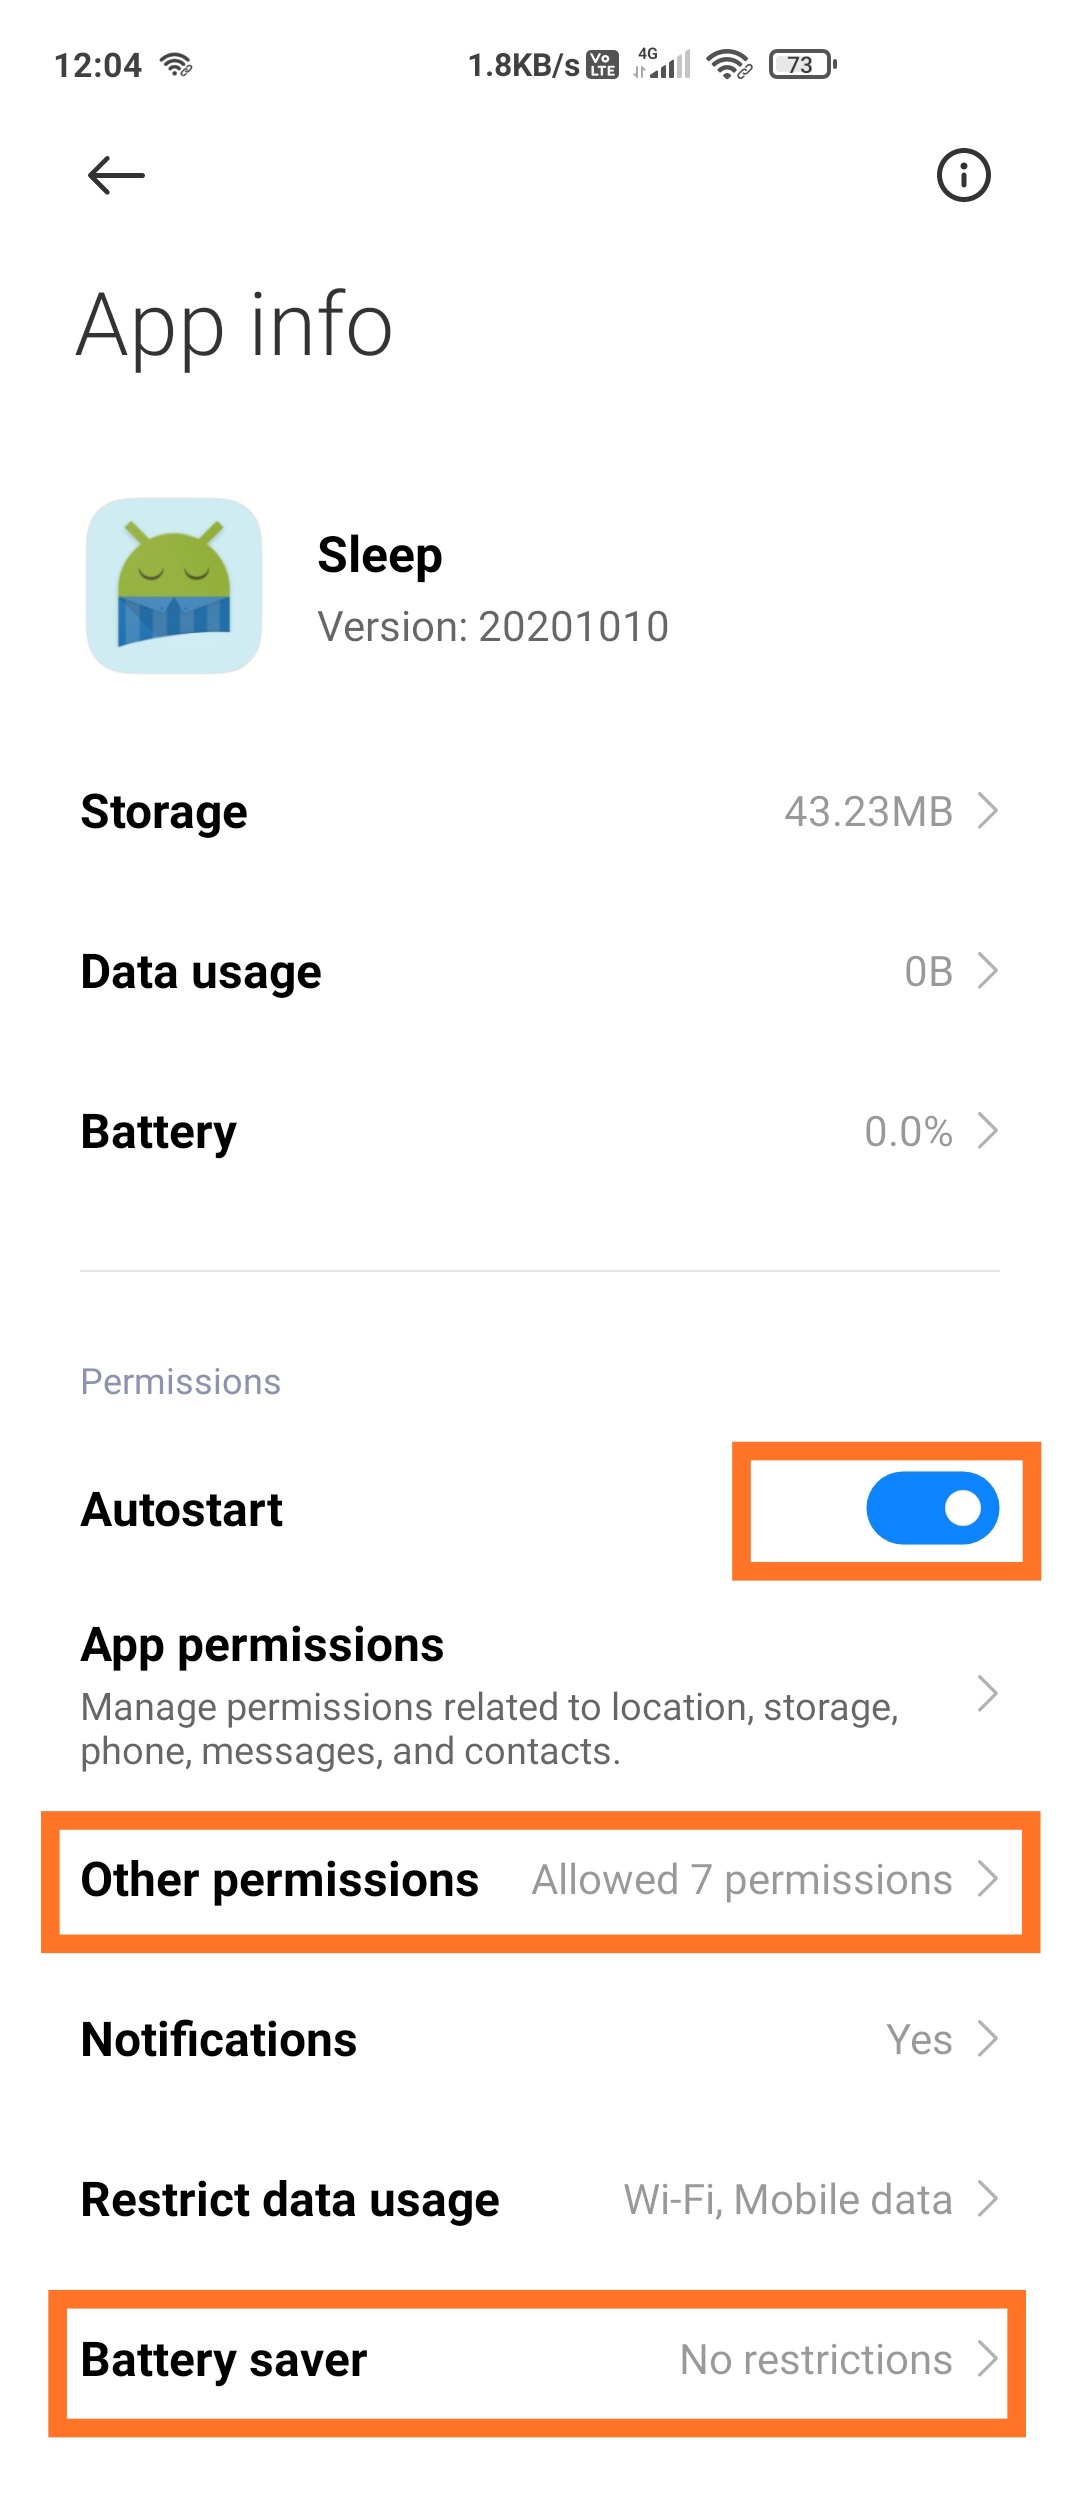 | 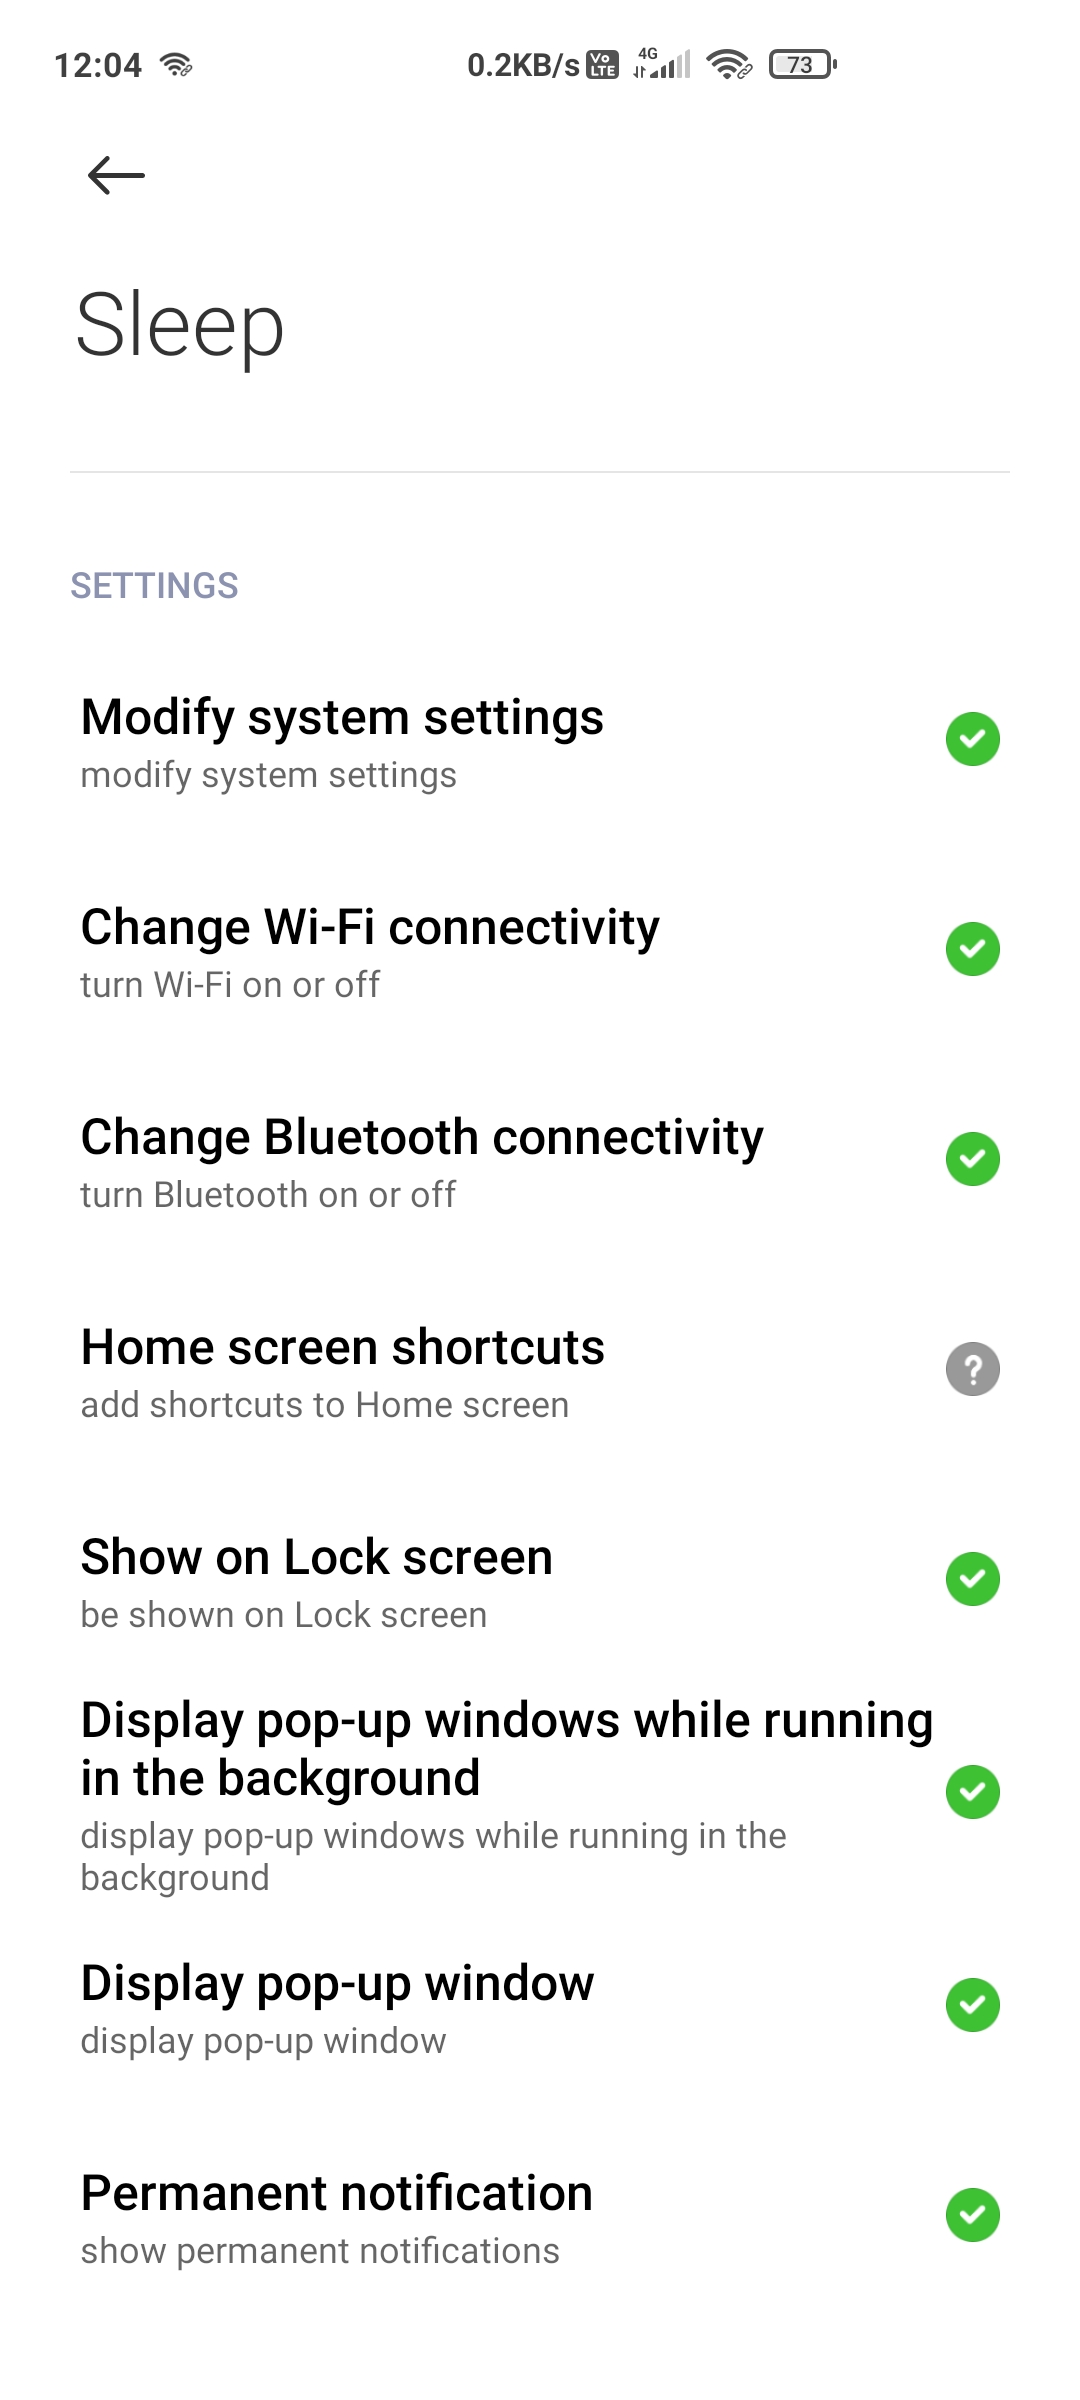 |  |
The permissions that usually need to be checked are:
- Notification: Switch to Enable
- Show notification on locked screen: Switch to Enable
- Display pop-up windows while running in the background: Switch to Enable
- Display pop-up window: Switch to Enable
- Battery saver: No restrictions
- Background data: Switch to Enable
You can find the relevant permission setting methods for your phone brand here.
Check the configuration of AndroidManifest.xml.
Open the file your_project/app/src/main/AndroidManifest.xml, make sure the following permissions are added.
Please pay attention and check item by item, especially the permissions related to notifications such as SYSTEM_ALERT_WINDOW, POST_NOTIFICATIONS, ACCESS_NOTIFICATION_POLICY, etc.
<uses-permission android:name="android.permission.INTERNET" />
<uses-permission android:name="android.permission.ACCESS_WIFI_STATE" />
<uses-permission android:name="android.permission.ACCESS_NETWORK_STATE" />
<uses-permission android:name="android.permission.BLUETOOTH" />

<uses-permission android:name="android.permission.RECORD_AUDIO" />
<uses-permission android:name="android.permission.MODIFY_AUDIO_SETTINGS" />
<uses-permission android:name="android.permission.CAMERA" />

<uses-permission android:name="android.permission.WAKE_LOCK" />
<uses-permission android:name="android.permission.VIBRATE"/>

<uses-permission android:name="android.permission.ACCESS_NOTIFICATION_POLICY"/>
<uses-permission android:name="android.permission.POST_NOTIFICATIONS"/>
<!--for bring app to foreground from background in Android 10 -->
<uses-permission android:name="android.permission.SYSTEM_ALERT_WINDOW" />
Check if the NavigatorKey and useSystemCallingUI are correctly configured.
- Please make sure that you call the following two methods:
- ZegoUIKitPrebuiltCallInvitationService().setNavigatorKey(navigatorKey);
- ZegoUIKitPrebuiltCallInvitationService().useSystemCallingUI
The complete code is as follows:
/// 1.1.1 define a navigator key
final navigatorKey = GlobalKey();

void main() async {
  WidgetsFlutterBinding.ensureInitialized();

  /// 1.1.2: set navigator key to ZegoUIKitPrebuiltCallInvitationService
  ZegoUIKitPrebuiltCallInvitationService().setNavigatorKey(navigatorKey);

  // call the useSystemCallingUI
  ZegoUIKit().initLog().then((value) {
    ZegoUIKitPrebuiltCallInvitationService().useSystemCallingUI(
      [ZegoUIKitSignalingPlugin()],
    );

    runApp(MyApp(navigatorKey: navigatorKey));
  });
}
- And please make sure that all your
MaterialAppalso use the samenavigatorKey.
Note that it must be the same navigatorKey object instance.
class MyAppState extends State {
  @override
  Widget build(BuildContext context) {
    return MaterialApp(
      navigatorKey: widget.navigatorKey,
      ...
    );
  }
}
Check if the init logic is handled correctly.
You need to ensure that every time the app is launched, whether the user logs in automatically or manually registers and logs in, you should make sure to call ZegoUIKitPrebuiltCallInvitationService().init.
/// on App's user login
void onUserLogin() {
  /// 1.2.1. initialized ZegoUIKitPrebuiltCallInvitationService
  /// when app's user is logged in or re-logged in
  /// We recommend calling this method as soon as the user logs in to your app.
  ZegoUIKitPrebuiltCallInvitationService().init(
    appID: yourAppID /*input your AppID*/,
    appSign: yourAppSign /*input your AppSign*/,
    userID: currentUser.id,
    userName: currentUser.name,
    plugins: [ZegoUIKitSignalingPlugin()],
  );
}

/// on App's user logout
void onUserLogout() {
  /// 1.2.2. de-initialization ZegoUIKitPrebuiltCallInvitationService
  /// when app's user is logged out
  ZegoUIKitPrebuiltCallInvitationService().uninit();
}
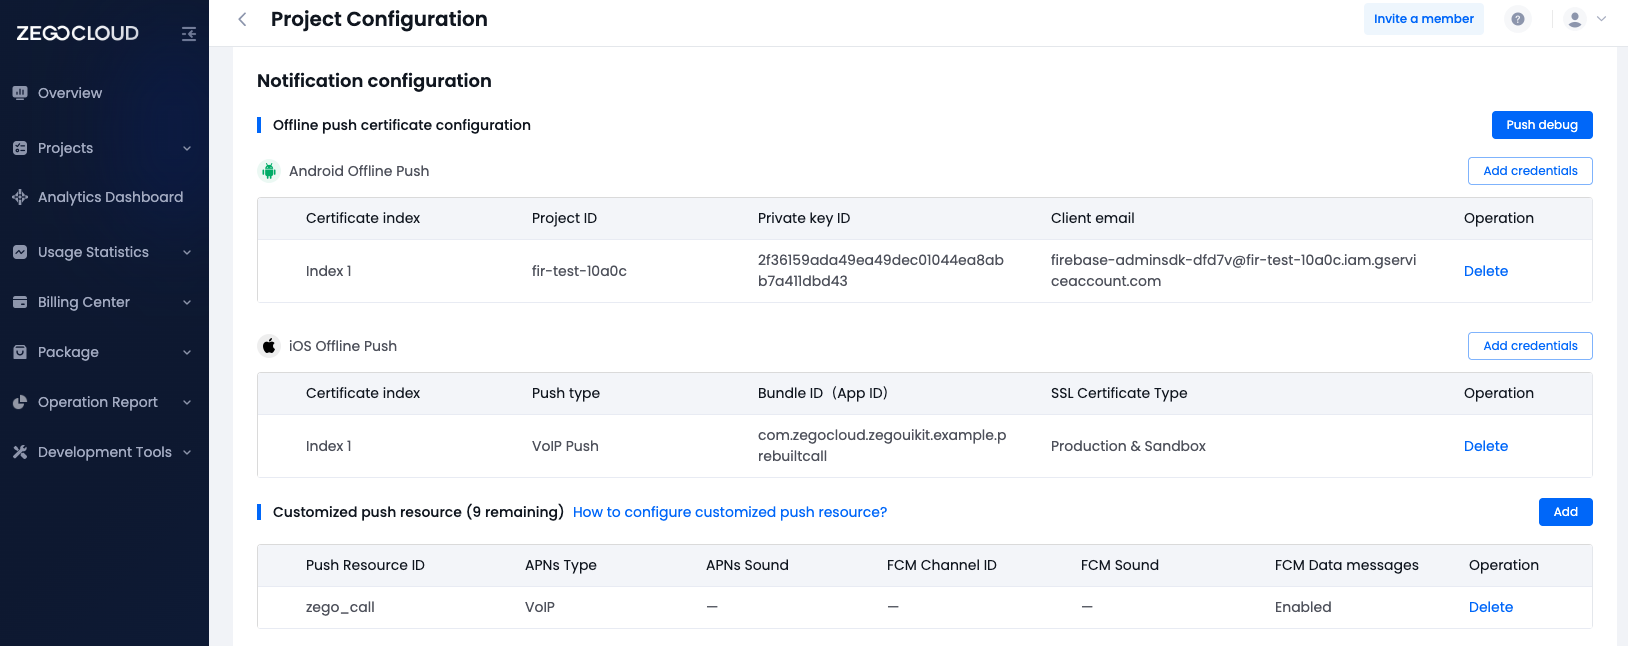
Check if the ResourceID configuration is correct.
- Please check that the resourceID configuration in the console is of the following types:
- APNsType: VoIP
- FCM Data messages: Enabled
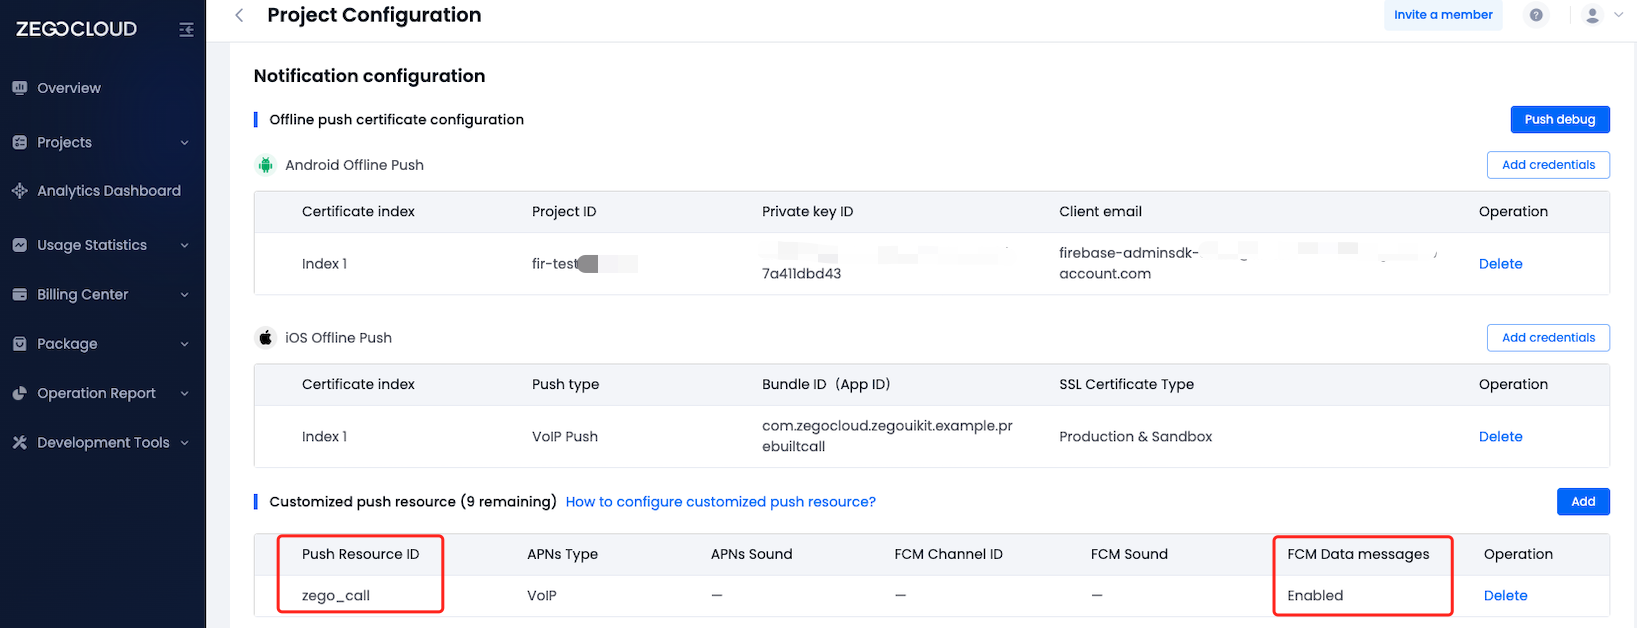
- Please check that the resourceID configured in the console is exactly the same as the resourceID used in the code by
ZegoSendCallInvitationButton.
ZegoSendCallInvitationButton(
    // 'resourceID' needs to be the same as the 'resourceID' configured in your console.
    resourceID: yourResourceID,
    // ...
)