

Send and receive messages
This document describes how to use the ZIM SDK (In-app Chat) to send and receive messages.
Solution
The following shows the access solution that the ZIM SDK provides.
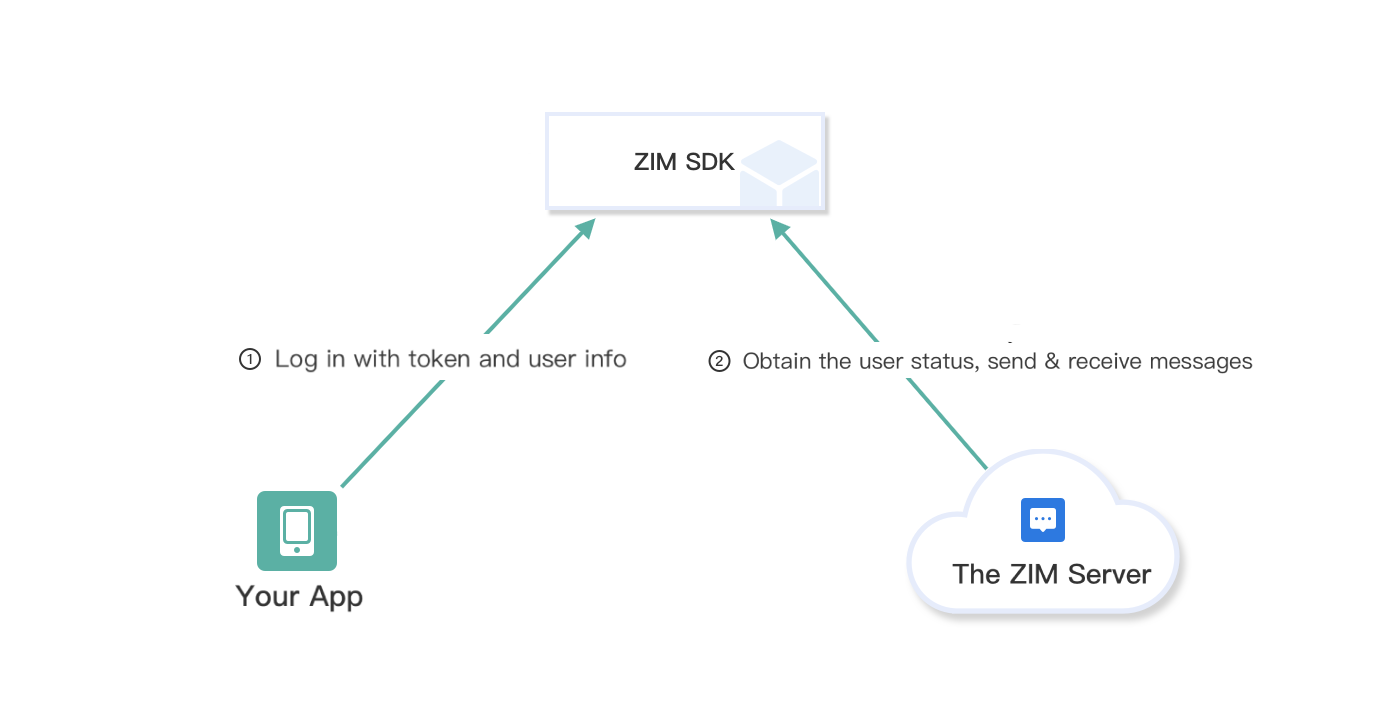
In this solution, you will need to implement the following business logic based on your actual business requirements:
- The logic for managing the users on the client, and the logic for distributing user ID for users to log in.
Prerequisites
Before you begin, make sure:
-
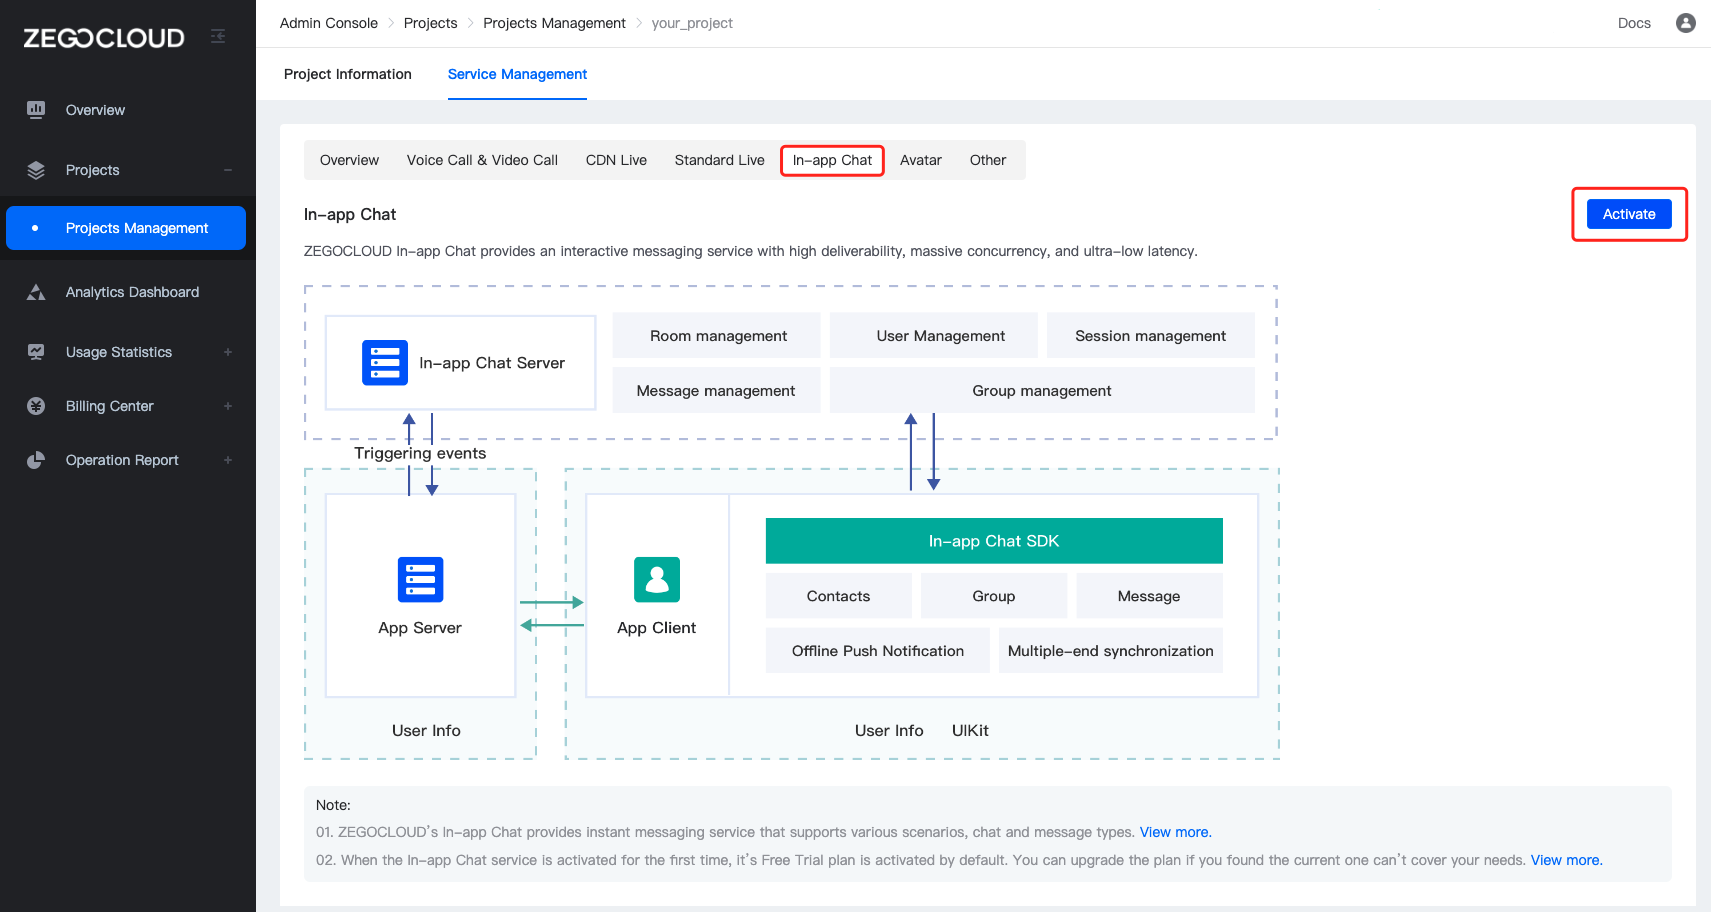
Go to ZEGOCLOUD Admin Console, and do the following:
-
Create a project, get the AppID and AppSign.
-
Activate the In-app Chat service (as shown in the following figure).
-
Android Studio 2020.3.1 or later
-
Android SDK Packages: Android SDK 25, Android SDK Build-Tools 25.0.2, Android SDK Platform-Tools 25.x.x or later.
-
An Android device or Simulator that is running on Android 4.4 or later and supports audio and video. We recommend you use a real device.
For SDK 2.3.0 or later, the AppSign authentication mode and Token-based authentication mode are both supported.
If you want to change your authentication mode, please refer to the Upgrade the authentication mode from using the AppSign to Token.
Integrate the SDK
Optional: Create a new project
Import the SDK
The Android ABIs are currently supported by the SDK: armeabi-v7a, arm64-v8a, x86, x86_64.
Choose either of the following methods to integrate the SDK into your project.
Method 1: Integrate the SDK automatically
- Set up repositories
-
If your Android Gradle Plugin is v7.1.0 or later: go to the root directory of your project, open the
settings.gradlefile, and add the following line to thedependencyResolutionManagement:Untitled... dependencyResolutionManagement { repositoriesMode.set(RepositoriesMode.FAIL_ON_PROJECT_REPOS) repositories { maven { url 'https://storage.zego.im/maven' } mavenCentral() google() } }1WarningIf you can not find the above fields in
settings.gradle, it's probably because your Android Gradle Plugin version is lower than v7.1.0.For more details, see Android Gradle Plugin Release Note v7.1.0.
-
If your Android Gradle Plugin is earlier than 7.1.0: go to the root directory of your project, open the
build.gradlefile, and add the following line to theallprojects:Untitled... allprojects { repositories { maven { url 'https://storage.zego.im/maven' } mavenCentral() google() } }1
- Declare dependencies:
Go to the app directory, open the build.gradle file, and add the following line to the dependencies. (x.y.z is the SDK version number, to obtain the latest version number, see Release Note)
...
dependencies {
    ...
    implementation 'im.zego:zim:x.y.z'
}
Method 2: Manually add the SDK to the project
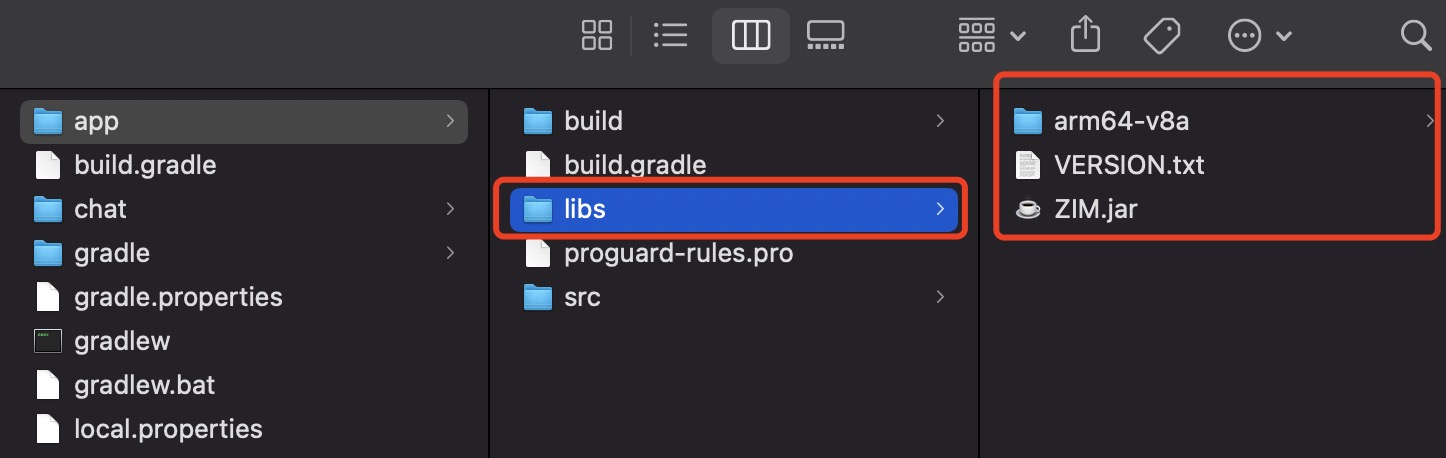
-
Download the latest version of SDK from SDK downloads.
-
Extract the files from the SDK packages into your project directory, for example,
app/libs.
-
Add SDK Import Statements. Open the file
app/build.gradle, and add the following contents: -
Add the
ndknode inside thedefaultConfignode to specify the supported ABIs.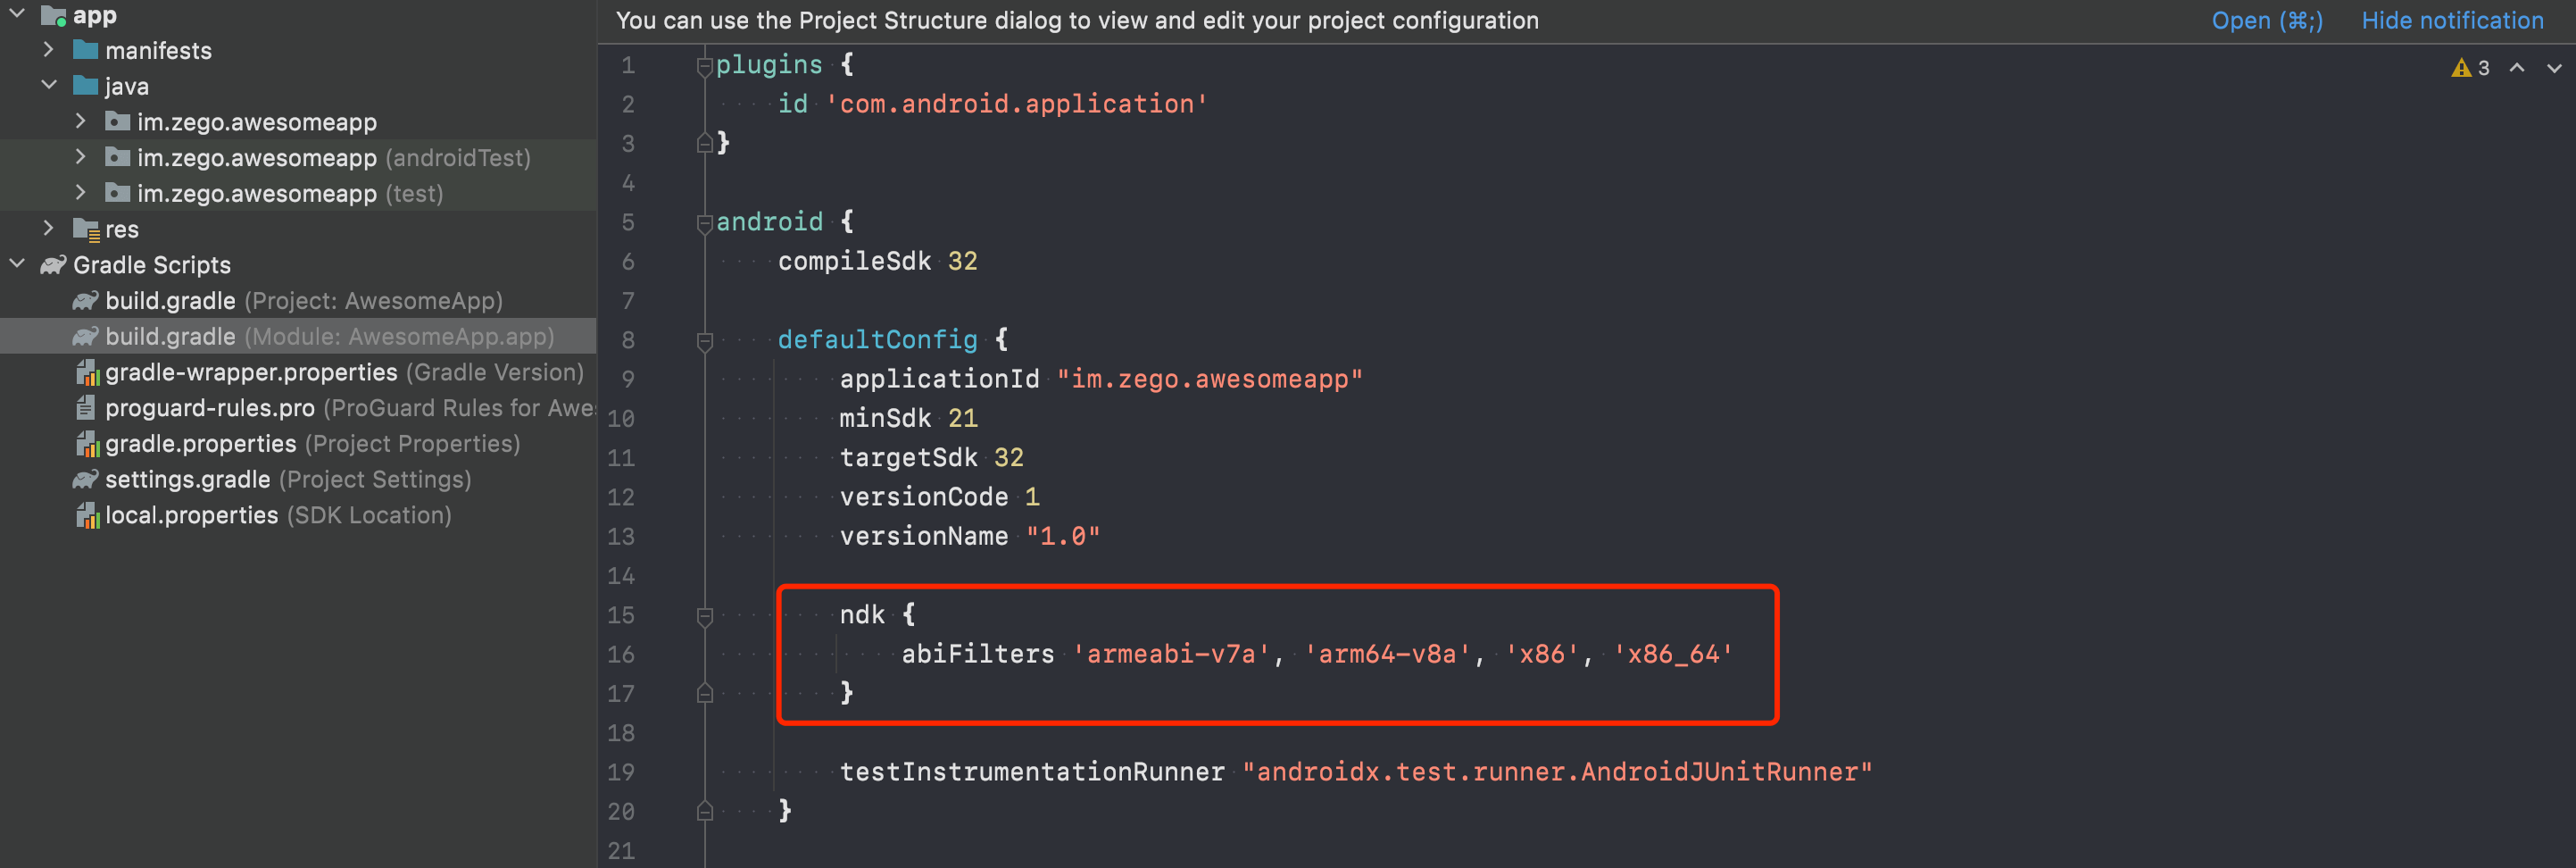 Untitled
ndk {
    abiFilters 'armeabi-v7a', 'arm64-v8a', 'x86', 'x86_64'
}
1 -
Add the
sourceSetsnode inside theandroidnode to specify the directory containing the SDK files.NoteThe directory libs is only an example for illustration, you can fill in based on the actual situation.
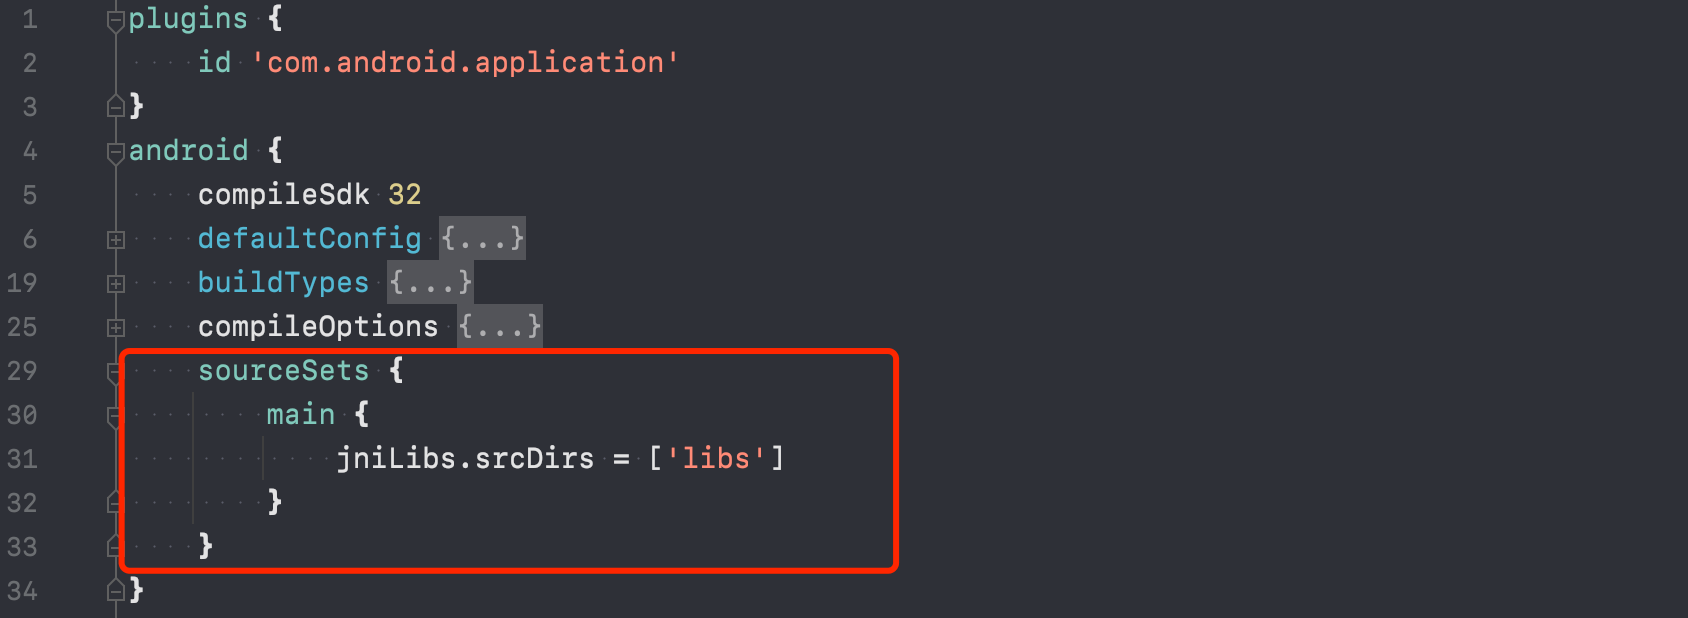 Untitled
sourceSets {
    main {
        jniLibs.srcDirs = ['libs']
    }
}
1 -
Add the following code in the
dependenciesnode.Untitleddependencies { implementation fileTree(dir: 'libs', include: ['*.jar']) ...... }1
Add permissions
Permissions can be set as needed.
Go to the directory app/src/main, open the AndroidManifest.xml file, and add the following code:
<!-- Permissions required by the SDK -->
<uses-permission android:name="android.permission.ACCESS_WIFI_STATE" />
<uses-permission android:name="android.permission.INTERNET" />
<uses-permission android:name="android.permission.ACCESS_NETWORK_STATE" />
Prevent class name obfuscation
To prevent the ZEGO SDK public class names from being obfuscated, you can add the following code in the file proguard-rules.pro.
-keep class **.zego.**{*;}
Implementation steps
Get the sample code
To download and run the sample code, see Sample app.
For the sample code related to this feature, check out the source files in the app/src/main/java/im/zego/zimexample/ui/room/ZIMPeerSessionActivity directory in the SDK sample code package.
Import the class file
Import the class file to your project:
import im.zego.zim.ZIM
Create a ZIM SDK instance
Creating a ZIM instance is the very first step, an instance corresponds to a user logging in to the system as a client.
So, let's suppose we have two clients now, client A and client B. To send and receive messages to each other, both of them will need to call the create method with the AppID and AppSign you get in the previous Prerequisites steps to create a ZIM SDK instance of their own:
// Create a ZIM SDK object and pass the AppID, AppSign, and Application in Android.
ZIMAppConfig appConfig = new ZIMAppConfig();
appConfig.appID = 0; // Replace the value with your AppID
appConfig.appSign = ""; // Replace the value with your AppSign
zim = ZIM.create(appConfig, application);
Since most developers only need to instantiate ZIM once throughout the entire process, We recommends using the getInstance method to obtain the created instance object.
// After successfully calling the create method to create an instance, you can obtain the zim object via the getInstance method.
// Calling the getInstance method before calling the create method or after calling the destroy method to destroy the instance will return null.
ZIM zim = ZIM.getInstance();
Set an event handler object
Before a client user's login, you will need to call the setEventHandler method to implement an event handler object, and customize the event callbacks, such as you can receive callback notifications when SDK errors occur or receive message related callback notifications.
zim.setEventHandler(new ZIMEventHandler() {
    @Override
    public void onPeerMessageReceived(ZIM zim, ArrayList<ZIMMessage> messageList, ZIMMessageReceivedInfo info, String fromUserID) {    // Implement the callback for receiving the one-to-one messages.
    }
});
For more details about related callbacks, see onReceivePeerMessage, onReceiveGroupMessage, and onReceiveRoomMessage.
Log in to the ZIM SDK
For client A and client B to send and receive messages after creating the ZIM SDK instance, they will need to log in to the ZIM SDK.
To log in, Clients A and B both need to call the login interface with the userID and the ZIMLoginConfig object to log in.
- You can custom the userID and userName, and we recommend you set the userID to a meaningful value and associate them with the account system of your application.
- For SDK 2.3.0 or later: The SDK uses the AppSign authentication mode by default. You can leave the token parameter blank when logging in.
- If you choose the token authentication, please refer to the Authentication to get the Token first, and pass it when logging in.
// userID must be within 32 bytes, and can only contain letters, numbers, and the following special characters: '~', '!', '@', '#', '$', '%', '^', '&', '*', '(', ')', '_', '+', '=', '-', '`', ';', '’', ',', '.', '<', '>', '/', '\'.
// userName must be within 256 bytes, no special characters limited.
String userID = "";
ZIMLoginConfig config = new ZIMLoginConfig();
config.userName = "";

// When logging in:
// If you are using the Token-based authentication mode, you will need to fill in the Token which you generated by referring to the [Authentication] doc.
// If you are using the AppSign mode for authentication (the default auth mode for v2.3.0 or later), leave the Token parameter blank.
config.token = "";

zim.login(userID, config, new ZIMLoggedInCallback() {
@Override
public void onLoggedIn(ZIMError error) {
      // You can know whether the login is successful according to the ZIMError.
}
});
Send one-to-one messages
Client A can send messages to client B after logging in successfully.
Currently, the ZIM SDK supports the following message types:
| Message Type | Description | Feature and Scenario |
|---|---|---|
| ZIMCommandMessage(2) | The signaling message whose content can be customized. A signaling message cannot exceed 5 KB in size, and up to 10 signaling messages can be sent per second per client. | Signaling messages, unable to be stored, are applicable to signaling transmission (for example, co-hosting, virtual gifting, and course materials sending) in scenarios with a higher concurrency, such as chat rooms and online classrooms. Higher concurrency is supported, but it's unreliable: it does not ensure message delivery and order. API: sendMessage |
| ZIMBarrageMessage(20) | On-screen comments in a chat room. An on-screen comment cannot exceed 5 KB in size, and there is no number limit on comments that can be sent per second per client. | On-screen comments, unable to be stored are usually unreliable messages that are sent at a high frequency and can be discarded. A high concurrency is supported, but it's unreliable: it does not ensure message delivery. API: sendMessage |
| ZIMTextMessage(1) | The text message. The default upper limit of message size is 2 KB. If necessary, please contact ZEGOCLOUD technical support for configuration, with a maximum size of up to 32 KB. Up to 10 text messages can be sent per second per client. | Text messages are reliable, in order, and able to be stored as historical messages. (For the storage duration, please refer to Pricing - Plan Fee - Plan Differences).
API: sendMessage、replyMessage |
| ZIMMultipleMessage(10) | Multi-item message, a message that can include multiple texts, up to 10 images, 1 file, 1 audio, 1 video, and 1 custom message. Note
| |
| ZIMImageMessage(11) | Image message. Applicable formats includes JPG, PNG, BMP, TIFF, GIF, and WebP. The maximum size is 10 MB. Up to 10 image messages can be sent per second per client. | |
| ZIMFileMessage(12) | File Message. A file message contains a file of any format and cannot exceed 100 MB in size. Up to 10 file messages can be sent per second per client. | |
| ZIMAudioMessage(13) | Audio message. An audio message contains an MP3 or M4A audio of up to 300 seconds and cannot exceed 6 MB in size. Up to 10 audio messages can be sent per second per client. | |
| ZIMVideoMessage(14) | A video message contains an MP4 or MOV video and cannot exceed 100 MB in size. Up to 10 video messages can be sent per second per client. Note To retrieve the width and height of the first video frame after a video is successfully sent, the video must be encoded in H.264 or H.265. | |
| ZIMCombineMessage(100) | For combined messages, there is no limit on message size, and the sending frequency of a single client is limited to 10 times/second. | |
| ZIMCustomMessage(200) | You can customize the message type and parse the message without using the ZIM SDK. The default upper limit of message size is 2 KB. If necessary, please contact ZEGOCLOUD technical support for configuration, with a maximum size of up to 32 KB. |
To send one-to-one messages, for example, client A wants to send a message to client B, then client A needs to call the sendMessage method with client B's userID, message content, and message type ZIMConversationType. And client A can be notified whether the message is delivered successfully through the callback onMessageSent.
- onMessageAttached callback: The callback on the message not sent yet. Before the message is sent, you can get a temporary ZIMMessage message for you to implement your business logic as needed. For example, you can get the ID of the message before sending it. Or when sending a message with large content, such as a video, you can get the localMessageID of the message before the message is uploaded to implement a Loading UI effect.
// The following shows how to send one-to-one message, the [conversationType] needs to be set to [ZIMConversationTypePeer].
String conversationID = "xxxx";

ZIMTextMessage zimMessage = new ZIMTextMessage();
zimMessage.message = "Message content";

ZIMMessageSendConfig config = new ZIMMessageSendConfig();
// Set priority for the message. 1: Low (by default). 2: Medium. 3: High.
config.priority = ZIMMessagePriority.LOW;
// Set the offline push notificaition config.
ZIMPushConfig pushConfig = new ZIMPushConfig();
pushConfig.title = "Title of the offline push";
pushConfig.content= "Content of the offline push";
pushConfig.extendedData = "Extended info of the offline push";
config.pushConfig = pushConfig;

// In 1-on-1 chats, the conversationID is the peer user ID. In group chats, the conversationID is the groupID. In the chat room, the conversationID is the roomID.
zim.sendMessage(zimMessage, conversationID, ZIMConversationType.Peer,config, new ZIMMessageSentCallback() {
@Override
public void onMessageAttached(ZIMMessage zimMessage){
      // The callback on the message not sent yet. You can get a temporary object here and this object must be the same as that created zimMessage object. You can make your own business logic using this as needed, for example, display a UI ahead of time.
}
@Override
public void onMessageSent(ZIMMessage zimMessage, ZIMError error) {
    // Implement the event callback on message sent.
}
});
Receive one-to-one messages
After client B logs in, he will receive client A's message through the callback onPeerMessageReceived which is already set in the setEventHandler method.
When a message is received, you need to determine the message is a Text message or a Command message because these two message types are based on the basic message. You need to convert the basic message class to a concrete message type and then retrieve the message content from the Message field.
zim.setEventHandler(new ZIMEventHandler() {
    @Override
    public void onPeerMessageReceived(ZIM zim, ArrayList<ZIMMessage> messageList, ZIMMessageReceivedInfo info, String fromUserID) {

        for (ZIMMessage zimMessage : messageList) {
            if (zimMessage instanceof ZIMTextMessage)
            {
                ZIMTextMessage zimTextMessage = (ZIMTextMessage) zimMessage;
                Log.e(TAG, "Received message:"+ zimTextMessage.message);
            }
        }
    }
});
Log out
For a client to log out, call the logout method.
zim.logout();
Destroy the ZIM SDK instance
To destroy the ZIM SDK instance, call the destroy method.
zim.destroy();