Quick start (with call invitation)
You can refer to this document to understand the effects of the offline call invitation (system-calling UI) and complete the basic integration.
-
If your project needs Firebase integration or customization of features like ringtone and UI, complete the basic integration first and then refer to Customize the call and Enhance the call for further configuration.
-
Offline call invitation configuration is complex. If you only require online call invitations, please skip the steps related to firebase console.
UI Implementation Effects
Recorded on Xiaomi , the outcome may differ on different devices.
| Online call | online call (Android App background) | offline call (Android App killed) |
|---|---|---|
 |  |  |
Prepare the environment
Before you attempt to integrate the SDK, make sure that the development environment meets the following requirements:
- Android Studio 2020.3.1 or a higher version.
- Android SDK 25, Android SDK Build-Tools 25.0.2, and Android SDK Platform-Tools 25.x.x or higher versions.
- An Android device running Android 4.4 or higher that supports audio and video.
- The Android device is connected to the Internet.
Integrate the SDK with the call invitation feature
Add ZegoUIKitPrebuiltCall as dependencies
- Add the
jitpackconfiguration
Enter your project's root directory, open the settings.gradle file to add the jitpack to dependencyResolutionManagement > repositories like this:
dependencyResolutionManagement {
   repositoriesMode.set(RepositoriesMode.FAIL_ON_PROJECT_REPOS)
   repositories {
      google()
      mavenCentral()
// !mark(1:2)
      maven { url 'https://maven.zego.im' }   // <- Add this line.
      maven { url 'https://www.jitpack.io' } // <- Add this line.
   }
}If you can't find the above fields in settings.gradle, it's probably because your Android Gradle Plugin version is lower than v7.1.0.
For more details, see Android Gradle Plugin Release Note v7.1.0.
Enter your project's root directory, open the build.gradle file to add the jitpack to allprojects->repositories like this:
allprojects {
    repositories {
        google()
        mavenCentral()
// !mark(1:2)
        maven { url 'https://maven.zego.im' }   // <- Add this line.
        maven { url "https://jitpack.io" }  // <- Add this line.
    }
}- Modify your app-level
build.gradlefile
dependencies {
    ...
// !mark
    implementation 'im.zego:zego_uikit_prebuilt_call_android:+'    // Add this line to your module-level build.gradle file's dependencies, usually named [app].
}Set up relevant permissions
- notification
If your targetSdk in project is 33 or after, please dynamic request notification permissions.Without this permission,we can't send notifications.Please refer to Notification runtime permission for more details.
- Appear on top / Display pop-up window
We need 'Appear on top ' or 'Display pop-up window' permission on some phones such as 'Xiaomi',without this permission,we can't show offline invitation calls.You can request this permission as follows
 // need a activityContext.
PermissionX.init(activityContext).permissions(permission.SYSTEM_ALERT_WINDOW)
   .onExplainRequestReason(new ExplainReasonCallback() {
       @Override
       public void onExplainReason(@NonNull ExplainScope scope, @NonNull List<String> deniedList) {
           String message = "We need your consent for the following permissions in order to use the offline call function properly";
           scope.showRequestReasonDialog(deniedList, message, "Allow", "Deny");
       }
   }).request(new RequestCallback() {
       @Override
       public void onResult(boolean allGranted, @NonNull List<String> grantedList,
           @NonNull List<String> deniedList) {
       }
});- Autostart
Some devices require special permissions to be enabled in order for your app to automatically display in the foreground when receiving a offline push message (such as Xiaomi). Therefore, you need to guide your app users to enable autostart permissions to make the feature work.
 |  |
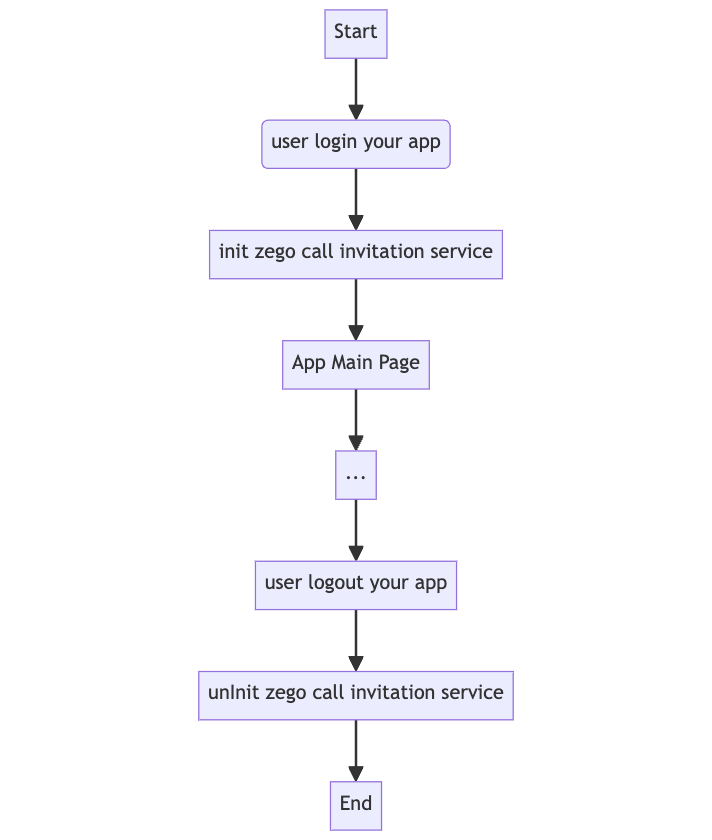
Initialize the call invitation service
Call the init method After the user logs in, and specify the userID and userName for connecting the Call Kit service.
We recommend calling this method immediately after the user logs into your app.
- After the user logs in, it is necessary to Initialize the ZegoUIKitPrebuiltCallService to receive call invitations.
- When the user logs out,it is nessary to uninit to clear the previous login records,preventing any impact on the next login
Application application = ; // Android's application context
long appID = ;   // yourAppID
String appSign =;  // yourAppSign
String userID =; // yourUserID, userID should only contain numbers, English characters, and '_'.
String userName =;   // yourUserName

ZegoUIKitPrebuiltCallInvitationConfig callInvitationConfig = new ZegoUIKitPrebuiltCallInvitationConfig();

ZegoUIKitPrebuiltCallService.init(getApplication(), appID, appSign, userID, userName,callInvitationConfig);Props of ZegoUIKitPrebuiltCallService component
| appID | long | Yes | The App ID you get from ZEGOCLOUD Console. |
| appSign | String | Yes | The App Sign you get from ZEGOCLOUD Console. |
| userID | String | Yes | userID can be something like a phone number or the user ID on your own user system. userID can only contain numbers, letters, and underlines (_). |
| userName | String | Yes | userName can be any character or the user name on your own user system. |
Add the button for making call invitations
You can customize the position of the ZegoSendCallInvitationButton accordingly, pass in the ID of the user you want to call.
String targetUserID = ; // The ID of the user you want to call.
String targetUserName = ; // The username of the user you want to call.
Context context = ; // Android context.

ZegoSendCallInvitationButton button = new ZegoSendCallInvitationButton(context);
button.setIsVideoCall(true);
button.setResourceID("zego_uikit_call"); // Please fill in the resource ID name that has been configured in the ZEGOCLOUD's console here.
button.setInvitees(Collections.singletonList(new ZegoUIKitUser(targetUserID,targetUserName)));Props of ZegoSendCallInvitationButton
| invitees | Array | Yes | The information of the callee. userID and userName are required. For example: [{ userID: inviteeID, userName: inviteeName }] |
| isVideoCall | Boolean | Yes | If true, a video call is made when the button is pressed. Otherwise, a voice call is made. |
| resourceID | String | No | resourceID can be used to specify the ringtone of an offline call invitation, which must be set to the same value as the Push Resource ID in ZEGOCLOUD Admin Console. |
| timeout | Number | No | The timeout duration. It's 60 seconds by default. |
For more parameters, go to Custom prebuilt UI.
Now, you can make call invitations by simply clicking on this button.
Configure Offline invitaion(FCM)
Make necessary configurations in Firebase Console and ZEGO Console
Create a project in Firebase Console
Add FCM certificate and create a resource ID in ZEGOCLOUD Console
When you have completed the configuration, you will obtain the resourceID. You can refer to the image below for comparison.
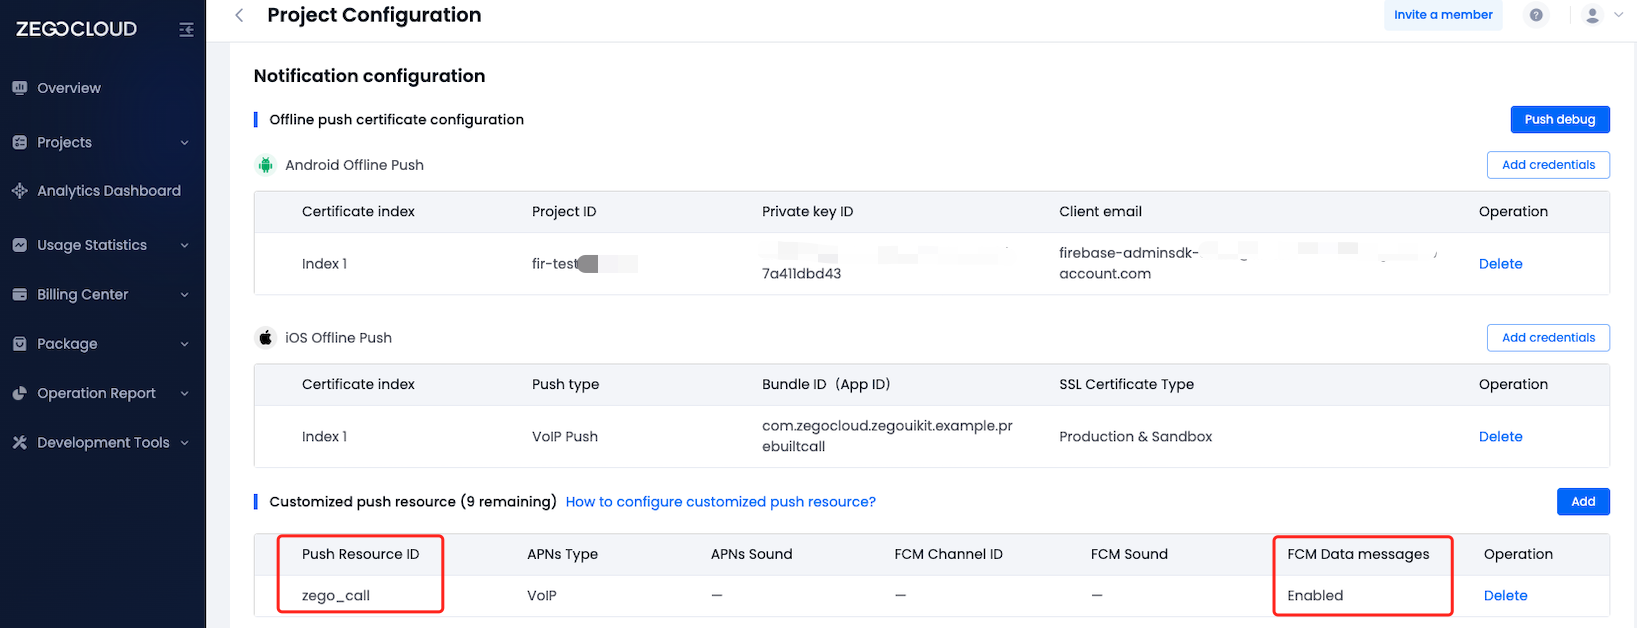
After the above is completed, the resourceID property value of ZegoSendCallInvitationButton needs to be replaced with the resource ID you get.
Create an Android application in Firebase Console and modify your code accordingly
Check whether the local config is set up properly.
Download the zego_check_android_offline_notification.py to your project's root directory, and run the following command:
python3 zego_check_android_offline_notification.pyYou will see the following if everything goes well:
✅ The google-service.json is in the right location.
✅ The package name matches google-service.json.
✅ The project level gradle file is ready.
✅ The plugin config in the app-level gradle file is correct.
✅ Firebase dependencies config in the app-level gradle file is correct.Debugging using the sample code.
Considering the complicated steps of configuring the offline call invitation, we recommend you download the Sample code for debugging during your integration.
About Firebaes Cloud Messaging
If your project has already integrated Firebase Cloud Messaging, you will need additional steps to complete the integration. Please refer to the FAQ for compatibility issues with Firebase.
Run & Test
Now you have finished all the steps!
You can simply click the Run on Android Studio to run and test your App on your device.
Related guides
Resources
Click here to get the complete sample code.